Some items may not be available depending on the scanning method you have selected or other settings you have made.
Menu Options for Scanning
Color Mode
Select whether to scan in color or in monochrome.
Select Auto to detects whether the original is color or monochrome, and automatically scans using the most suitable color mode. Depending on the original, monochrome originals may be detected as colored, or colored originals as monochrome. If auto detection is not operating correctly, scan by selecting Color or B&W as the color mode, or set the detection sensitivity. You can set the sensitivity by selecting Settings on the home screen > General Settings > System Administration > Color Sensitivity.
File Format
Select the file format.
Page Setting
When you select PDF, Compact PDF, PDF/A, Compact PDF/A, or TIFF as the file format, select whether to save all originals as one file (multi-page) or save each original separately (single page).
Compression Ratio
Select how much to compress the image.
PDF Settings
When you have selected PDF as the save format setting, use these settings to protect PDF files.
To create a PDF file that requires a password when opening, set Document Open Password. To create a PDF file that requires a password when printing or editing, set Permissions Password.
OCR
You can save the scanned image as a searchable PDF. This is a PDF in which searchable text data is embedded.
Text on the originals is recognized using Optical Character Recognition (OCR), and then embedded in the scanned image.
This item is not available when using the To Computer, To Cloud, To Storage, or Storage to Cloud menu.
Note:
Depending on the original, text may not be recognized correctly.
Language: Select the source text language of the original.
Page Orientation: Select the orientation of the output image. Select Auto Rotation to rotate the image automatically to match the direction of the recognized text in the original.
Select the scan area. To scan at the maximum area of the scanner glass, select Max Area.
Orientation (Original):
Select the orientation of the original.
Original Type
Select the type of your original.
Orientation (Original)
Select the orientation of the original.
Mixed Size Originals
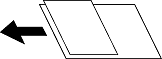
You can place the following combination of sizes in the ADF at the same time.
A3 and A4
B4 and B5
A4 and A5
When using these combinations, originals are scanned at the actual size of the originals. Place your originals by aligning the width of the originals as shown below.
Density
Select the contrast of the scanned image.
Image Quality
Adjust image settings.
Contrast
Adjust the difference between the bright and dark areas.
Saturation
Adjust the vividness of the colors.
Red Balance, Green Balance, Blue Balance
Adjust the density for each color.
Sharpness
Adjust the outline of the image.
Hue Regulation
Adjust the color tone of skin. Tap + to make it cold (increase green) and tap - to make it warm (increase red).
Remove Background
Select the darkness of the background. Tap + to lighten (whiten) the background and tap - to darken (blacken) it.
If you select Auto, the background colors of the originals are detected, and they are removed or lightened automatically. The feature may not work correctly if the background color is too dark or not detected.
Remove Shadow
Remove the shadows of the original that appear in the scanned image.
Frame:
Remove the shadows at the edge of the original. Select Rear Page to set the area for the rear side individually when scanning 2-sided originals.
Center:
Remove the shadows of the binding margin of the booklet.
Remove Punch Holes
Remove the punch holes that appear in the scanned image. You can specify the area to erase the punch holes by entering a value in the box on the right.
Erasing Position:
Select the position to remove the punch holes.
Orientation (Original):
Select the orientation of the original.
Skip Blank Pages
Skip blank pages when scanning if there are any in the originals.
If the result is not what you expected, adjust detection level.
Note:
Some pages may be incorrectly skipped as blank pages.
ADF Continuous Scan
You can place a large number of originals in the ADF in batches, and scan them as a single scanning job.
ID Card
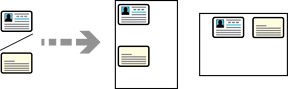
Scans both sides of an ID card using the scanner glass, and then saves them in one image.
To scan both sides, follow the steps below.
1. Place the ID card facing down and start scanning.
2. After scanning this side, turn it over, place it back on the scanner glass, and then tap Start Scanning.
3. When scanning is complete, tap Last Original to save the image.
Note:
When using this feature, the output image size differs depending on the settings in Settings > General Settings > Basic Settings > Original Size Auto Detection Option.
When Metric Size Priority is selected: A4
When Inch Size Priority is selected: Letter
When K Size Priority is selected: 16K
Orientation (Original):
Select the orientation of the original.
File Storing
You can save the scanned image to the storage.
Setting:
Select whether or not to save the scanned image only to the storage.
Folder (Required):
Select the storage in which to save the scanned image.
File Name:
Set the file name.
File Password:
Set the password to select the file.
User Name:
Set the user name.
Erase Red Color
Remove red notes from a scanned image.
This item is not available when using the To Computer, Storage to Memory Device, Storage to Email, Storage to Network Folder/FTP, or Storage to Cloud menu.