
|
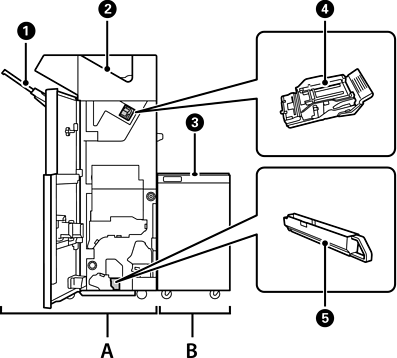
A |
Staple Finisher |
Sorts and staples paper before ejecting it. Punches holes using the optional hole punch unit. |
|
B |
Finisher Bridge Unit |
To operate the staple finisher or booklet finisher you need to install the finisher bridge unit. |
|
|
Finisher tray |
Holds sorted or stapled documents. |
|
|
Finisher upper tray |
Holds the ejected paper. Depending on the paper quality, printing data with multiple images or photos may cause the paper to curl. If curling occurs, try using another output tray. |
|
|
Face up tray |
Holds the ejected paper. |
|
|
Staple Cartridge |
Holds staples for flat stitching. |
|
|
Punch Waste Tray |
Collects punch hole scraps. |
|
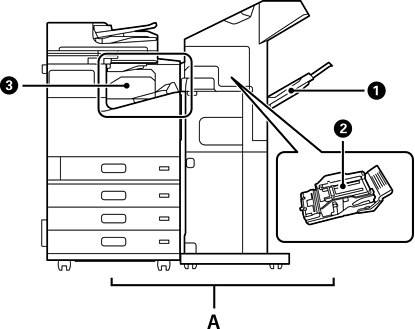
A |
Staple Finisher-P2 |
Sorts and staples paper before ejecting it. |
|
|
Finisher tray |
Holds sorted or stapled documents. |
|
|
Staple Cartridge |
Holds staples for flat stitching. |
|
|
Staple Finisher Bridge Unit |
Connects the printer to staple finisher-P2. Open when removing jammed paper. |
|
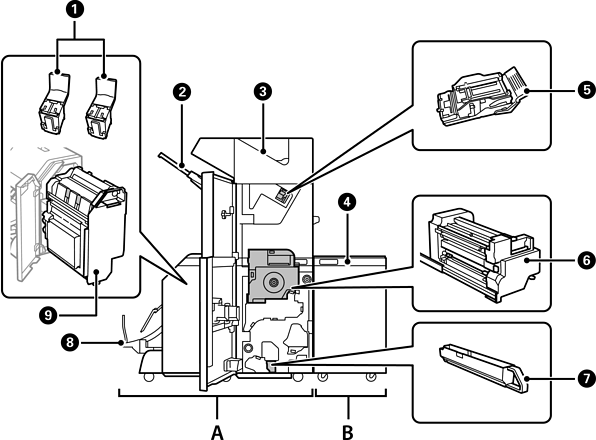
A |
Booklet Finisher |
Sorts, saddle stitches, folds, and staples the paper before ejecting it. Punches holes using the optional hole punch unit. |
|
B |
Finisher Bridge Unit |
To operate the staple finisher or booklet finisher you need to install the finisher bridge unit. |
|
|
Staple Cartridge |
Holds staples for saddle stitching. |
|
|
Finisher Tray |
Holds sorted or stapled documents. |
|
|
Finisher upper tray |
Holds the ejected paper. Depending on the paper quality, printing data with multiple images or photos may cause the paper to curl. If curling occurs, try using another output tray. |
|
|
Face up tray |
Holds the ejected paper. |
|
|
Staple Cartridge |
Holds staples for flat stitching. |
|
|
Inner Unit |
Pull out when a paper jam occurs. |
|
|
Punch Waste Tray |
Collects punch hole scraps. |
|
|
Booklet Tray |
Holds folded or saddle stitched documents. |
|
|
Saddle stitch unit |
Pull out to replace the Staple Cartridge ( |
|
|
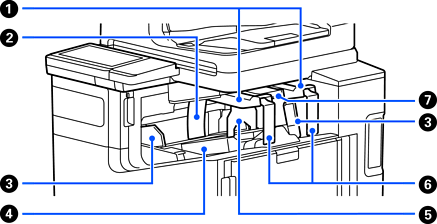
Upper Unit L |
Adjust the position to match the paper size (large size) for printing. |
|
|
Film |
Remove this when using envelopes or special types of paper. |
|
|
Edge Guides |
Align the sides of the printed paper. Adjust the position according to the paper size. |
|
|
Lower Unit |
Holds the printed paper. |
|
|
Stopper S |
Align the leading edge of the printed paper (small/medium size). Change the mounting position on the upper unit S according to the paper size. |
|
|
Stopper L |
Align the leading edge of the printed paper (large size). |
|
|
Upper Unit S |
Adjust the position to match the paper size (small/medium size) for printing. |
|
|
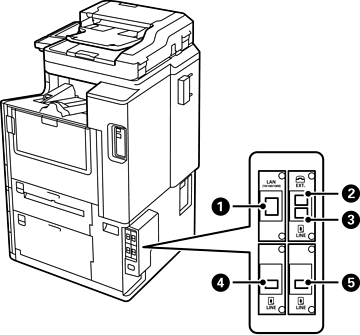
LAN port |
You can use two wired LAN lines by installing the optional Ethernet board. |
|
|
EXT. port |
You can connect external phone devices. This is for standard faxing. |
|
|
LINE1 port |
You can add up to 3 lines and use each line for standard faxing, or network faxing to send and receive documents on your computer. In addition, you can connect to multiple phone lines so that you can send to a number of destinations more quickly, or dedicate one line to receiving faxes to reduce the duration of time where you cannot receive calls. * *: External phones are not available. |
|
|
LINE2 port |
|
|
|
LINE3 port |
|
|
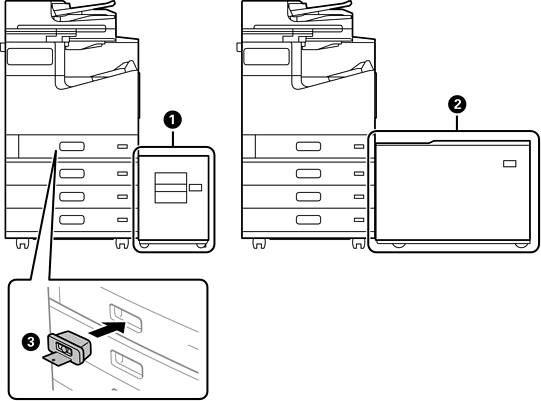
A4 High Capacity Tray-P1 |
Allows you to load a large quantity of A4, Letter, or smaller size paper. |
|
|
A3 High Capacity Tray-P1 |
Allows you to load a large quantity of A3 or smaller size paper. |
|
|
Paper Cassette Lock |
Locks the paper cassette if you want an administrator to manage paper. |


