
Check the error displayed on the control panel and follow the instructions to remove the jammed paper, including any torn pieces or jammed staples. The LCD screen displays animated instructions that show you how to remove jammed paper or staples. Next, select OK to clear the error.
Never touch the buttons on the control panel while your hand is inside the printer. If the printer starts operating, it could cause an injury. To avoid injury, be careful not to touch any protruding parts.
Never touch the areas inside the booklet finisher that are marked with caution labels. Those areas may be very hot and high temperature may cause burns.
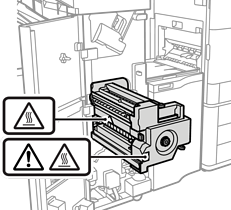
Remove the jammed paper carefully. Removing the paper with too much force may damage the printer.
If paper jams occur repeatedly, you might be able to resolve the problem by selecting On as the Printout Alignment Improvement setting. Note that printing may take longer.
Control panel
Settings > General Settings > Printer Settings > Printout Alignment Improvement
Paper jams when stapling: Set Finisher(Staple) to On.
Paper jams when not stapling: Set Finisher(Non-staple) to On.
Paper jams when folding and saddle stitching: Set Finisher(Saddle Stitch/Fold) to On.
Printer driver (Windows)
Select Maintenance tab > Extended Settings > Printout Alignment Improvement (Finisher) > On
Printer driver (Mac OS)
1. Select System Preferences (or System Settings) from the Apple menu > Printers & Scanners (or Print & Scan or Print & Fax), and then select the printer.
2. Select Options & Supplies > Options > Printout Alignment Improvement (Finisher) > On, and then click OK.
Lower the density setting. If the density is too high, paper may be wavy or curled, which can cause this problem.