
The optional staple finisher has a feature that allows you to staple manually. This feature is useful when you forget to staple the printouts or want to staple the originals.
Number of sheets that can be manually stapled:
The available paper sizes are set and fixed when the printer is installed.
For A4 or A3
Paper size: A4
60 to 90 g/m2: 50 sheets
91 to 105 g/m2: 40 sheets
Paper size: A3
60 to 90 g/m2: 30 sheets
91 to 105 g/m2: 20 sheets
For Letter or Legal
Paper size: Letter
60 to 90 g/m2: 50 sheets
91 to 105 g/m2: 40 sheets
Paper size: Legal
60 to 90 g/m2: 30 sheets
91 to 105 g/m2: 20 sheets
Press the staple position switching button.
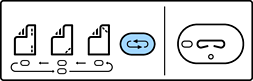
The shutter of the paper output unit of the finisher tray opens and the manual staple mode is enabled.
Set the position to staple.
Press the staple position switching button to switch the setting. The green light under the selected staple position turns on. You can change the selection by pressing the staple position switching button.
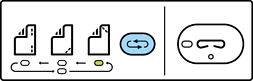
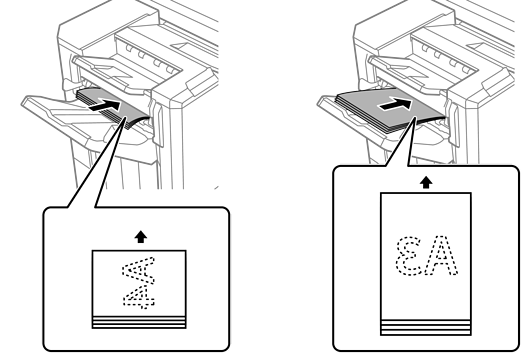
Load paper.
Load paper with the printable side facing down and the shutter for the paper output unit open.
Adjust the paper loading position according to the staple position.
Do not place your hand into the opening of the paper output unit.
Press the staple position switching button before loading paper. This button is not available when paper is loaded.
When paper is loaded correctly, the staple button light turns on. If the light is off, load paper again.
Staple.
Take your hands off the paper, and then press the staple button.
To exit manual staple mode, press the staple position switching button several times to turn the light off.
If an unexpected event occurs, an error light on the printer’s control panel turns on or flashes and a message is displayed.