
Simple Scan Screen
This screen allows you to execute a scan just by clicking the scan icon.
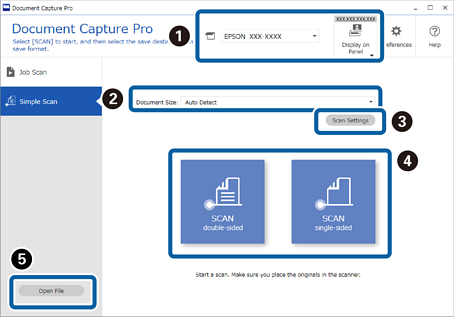
*: Only available for specific models.
|
Item |
Explanation |
|
|---|---|---|
|
|
Select Scanner |
When you start the software it automatically connects to the last scanner you used. If you want to use a different scanner, you can select it from the drop-down list. |
|
Display on Panel* |
When you perform a scan from the scanner, the computer on which this button is pressed will be given priority on the scanner’s panel. Your computer's information is registered to the scanner. You can register up to 10 computers to one scanner. When the maximum limit is reached, registered computers are overwritten starting from the oldest. To select a scanner with the same model name but a different IP address, select Change the scanner from Display on Panel, and then change the connection destination from Scanner Settings. |
|
|
|
Document Size |
Select the size of the original. When Auto Detect is selected, the original size is automatically detected. |
|
|
Scan Settings |
You can make more detailed settings such as the resolution. |
|
|
SCAN double-sided SCAN single-sided |
Start scanning. |
|
|
Open File |
You can select a previously scanned file to correct the orientation of the image, or add, insert, or rearrange pages. Open the file from any folder, and then edit it on the Edit Scanned Results screen. The following are the file formats that can be read.
|


