
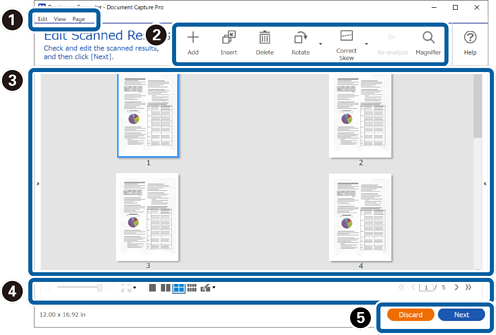
Edit Scanned Results Screen
This screen is displayed when scanning is complete.
You can correct the orientation of the image, add/insert/rearrange the order of the pages
|
Item |
Explanation |
|||
|---|---|---|---|---|
|
(1) |
Edit |
You can copy, delete, and edit images from the Edit menu at the top of the screen. |
||
|
Undo |
Restores the image to its original status before edits were made. |
|||
|
Cut |
Cuts out the selected image (page). |
|||
|
Copy |
Copies the selected image (page). |
|||
|
Paste |
Pastes the copied image (page). |
|||
|
Delete |
Deletes the selected image (page). |
|||
|
Select |
Sets the method for selecting images (pages). |
|||
|
Rotate |
Rotates the selected image (page). |
|||
|
Correct Skew |
Manually adjusts the angle of the selected image (page). Enter the adjustment angle on the Adjust Angle screen, or select Auto to adjust automatically. |
|||
|
Split Image |
Splits the selected image. When you split the page into left and right parts, the pages are assigned in order from left to right. |
|||
|
(2) |
View |
You can adjust how the page is displayed from the View menu at the top of the screen. |
||
|
Zoom |
When the preview is displayed on a single page, you can set the display magnification of the image (page). |
|||
|
Navigation |
Moves from the selected image (page). |
|||
|
Page Layout |
Select the number of horizontal x vertical images to be displayed in the preview. |
|||
|
Magnifier |
You can zoom in on the area of the image around the mouse cursor on the screen. |
|||
|
(3) |
Page |
You can perform operations such as adding or rearranging pages from the Page menu at the top of the screen. |
||
|
Add Page(s) |
You can add additional originals after the last page by scanning them or importing them from a specified file. To scan additional pages, place the originals you want to add on the scanner, and then select Acquire from Scanner. |
|||
|
Insert Page(s) |
You can insert additional originals before the currently selected page by scanning them or importing them from a specified file. To scan additional pages, place the originals you want to add on the scanner, and then select Acquire from Scanner. |
|||
|
Replace Page(s) |
You can replace the selected image with a newly scanned image or a specified file. To scan new pages, place the originals you want to add on the scanner, and then select Acquire from Scanner. |
|||
|
Sort |
Sorts images. You can select from By Date Scanned, By Size, By Color, Book Sort, or Reverse Order. If you select Book Sort, you can sort booklet documents in page order. |
|||
|
|
Add |
You can scan additional originals and add them after the last page. Place the originals you want to add on the scanner, and then click Add. |
||
|
Insert |
You can insert additional originals before the currently selected page by scanning them. Place the originals you want to add on the scanner, and then click Insert. |
|||
|
Delete |
Deletes the selected image. |
|||
|
Rotate |
Rotates the selected image (page). |
|||
|
Correct Skew |
Manually adjusts the angle of the selected image (page). Enter the adjustment angle on the Adjust Angle screen, or select Auto to adjust automatically. |
|||
|
Magnifier |
You can zoom in on the area of the image around the mouse cursor on the screen. |
|||
|
|
Preview Scan |
Displays the scanned image. You can also rearrange the pages by dragging and dropping the thumbnails. |
||
|
|
 |
When the preview is displayed on a single page, you can use the slider to change the magnification of the image. |
||
 |
When the preview is displayed on a single page, you can adjust the image display size to the page size, page height, page width, or 100% magnification. |
|||
 |
Select the number of horizontal x vertical images to be displayed in the preview. |
|||
 |
Displays the current/total number of pages. You can enter a page number or click the arrows to go to a page. |
|||
|
|
Discard |
Discards the scanned image and closes. |
||
|
Next |
Go to the Select Destination screen. |
|||


-
BMP, JPEG, TIFF, Multi-TIFF, PDF, and PNG file formats support page operations such as Insert Page.
-
Only PDFs created using an Epson application are supported.

