
Distributing Jobs Using the Installer
If you run the installer with the Document Capture Pro installer (Setup.exe) and the job file (.jxz) in the same folder, you can install Document Capture Pro and import jobs at the same time. In addition, you can also include a setup configuration file (Setup.ini) that specifies the installation operations, and omits the installation specifications.
This section explains how to create a Setup.ini using the Setup Configuration Tool to create an installer that will install Document Capture Pro and import job files at the same time.
When you use the installer created in this procedure, a job with the account information for the image destination is setup on the destination computer; this allows users who do not know the account information to upload images to that destination. Either make sure the installer is only distributed to trusted users, or prepare a job with no registered account information in advance.
-
1Export the job.
-
Make sure you export jobs used for silent import without setting a password for protection.
-
When you perform Export Job, all of the jobs registered to the selected scanner as well as the button assignment settings are exported.When distributing jobs for multiple models, select the target scanner from the Document Capture Pro top screen, and then repeat the export operation. Store the job files you created in one place.
-
-
2Download the Document Capture Pro installer (self-extracting format).
Download the installer from Epson's website.
-
3Change the extension for the Document Capture Pro installer (self-extracting format) to "zip" (compressed file format), and then un-zip the renamed file.
Setup.exe and a configuration file will be generated.
-
4Access the Document Capture Pro installation folder, and launch the SetupConfigurationTool.exe (Setup Configuration Tool) from the tools folder.
Example: <C:\Program Files (x86)\EPSON Software\Document Capture\tools\>
-
5Configure the installer.
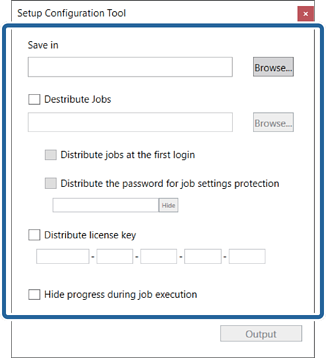
Item
Explanation
Save in
Specify the location to save the Setup.ini (setup configuration file).
Select the folder that contains the Setup.exe and the configuration file created (un-zipped) in step 3.
Job
Select the job file that you created in step 1. If you are distributing jobs for multiple models, select all applicable job files.
Distribute jobs at the first login
Select this to distribute the job to all users who log in to the same computer.
Distribute the password for job settings protection
Select this to restrict editing when you install Document Capture Pro using the distribution installer.
If a user wants to edit a job, they must clear Protect job settings on the Basic Settings screen, and then enter the password set by the administrator.
Distribute the license key
Enter the license key for DCP Enhanced OCR.
Note:You can create an installer that allows you to simultaneously install Document Capture Pro and distribute DCP Enhanced OCR licenses. See the following for more details.
Hide progress during job execution
Select this to hide the progress bar that is displayed during scanning.
-
6Click Output.
The setup configuration file (Setup.ini) is saved in the folder selected in Save in. Also, the selected job file is copied.

-
7Distribute Setup.exe, the setup configuration file (Setup.ini), and the folder containing the job files to the target installation computer.

