> Scanning > Scanning from a Computer > Scanning Using Epson Scan 2

Scanning Using Epson Scan 2

You can scan by selecting Document Mode, which is ideal for documents, or Photo Mode, which is ideal for photos and pictures.

  1. Place the original.

  2. Start Epson Scan 2.

    • Windows 11/Windows Server 2025
      Click the start button, and then select All apps > EPSON > Epson Scan 2.
    • Windows 10/Windows Server 2022/Windows Server 2019/Windows Server 2016
      Click the start button, and then select EPSON > Epson Scan 2.
    • Windows 8.1/Windows 8/Windows Server 2012 R2/Windows Server 2012
      Enter the application name in the search charm, and then select the displayed icon.
    • Windows 7/Windows Server 2008 R2/Windows Server 2008
      Click the start button, and select All Programs or Programs > EPSON > Epson Scan 2 > Epson Scan 2.
    • Mac OS
      Select Go > Applications > Epson Software > Epson Scan 2.
  3. Select Mode.

    • Document Mode: You can scan the originals using image adjustment functions that are ideal for text documents.
    • Photo Mode: You can scan originals using image adjustment functions that are ideal for photos or pictures.
  4. Select settings on the Main Settings tab.

    The items you can set vary depending on the Mode you select.

    See the Epson Scan 2 help for details on using the settings. Click the ? icon at the bottom left of the screen.

  5. Select other scan settings as necessary.

    • You can preview the scanned image by clicking the Preview button. The preview window opens, and the previewed image is displayed.
    • On the Advanced Settings tab, you can select detailed image adjustment settings.
      See the Epson Scan 2 help for details on using the settings.
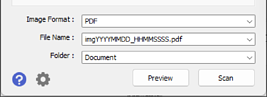
  6. Set the file saving settings.

    • Image Format: Select the file format for saving the scanned image from the list.
      You can select detailed settings for each file format except BITMAP and PNG. After selecting the save format, select Options from the list.
    • File Name: Confirm the displayed file name.
      You can change settings for the file name by selecting Settings from the list.
    • Folder: Select the save folder for the scanned image from the list.
      You can select another folder or create a new folder by selecting Select from the list.
  7. Click Scan.

    Note:

    You can also start scanning by tapping on the scanner’s control panel.

    The scanned image is saved to the folder you specified.