> Scanning > Scanning from a Computer > Scanning Using Epson Scan 2

Scanning Using Epson Scan 2

You can scan the originals using detailed settings that are suitable for text documents.

  1. Place the original.

  2. Start Epson Scan 2.

    • Windows 10/Windows Server 2016
      Click the start button, and then select EPSON > Epson Scan 2.
    • Windows 8.1/Windows 8/Windows Server 2012 R2/Windows Server 2012
      Enter the application name in the search charm, and then select the displayed icon.
    • Windows 7/Windows Vista/Windows XP/Windows Server 2008 R2/Windows Server 2008/Windows Server 2003 R2/Windows Server 2003
      Click the start button, and then select All Programs or Programs > EPSON > Epson Scan 2 > Epson Scan 2.
    • Mac OS
      Select Go > Applications > Epson Software > Epson Scan 2.
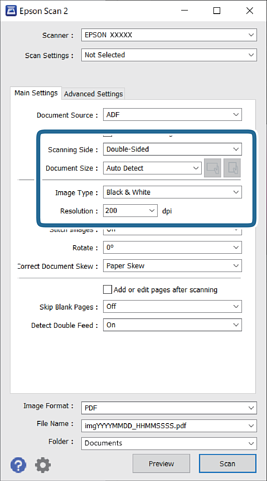
  3. Make the following settings on the Main Settings tab.

    • Scanning Side: Select the side of the original you want to scan. Select Double-Sided to scan both sides of the originals.
    • Document Size: Select the size of the original you placed.
    • / (Original orientation) buttons: Select the set orientation of the original you placed. Depending on the size of the original, this item may be set automatically and cannot be changed.
    • Image Type: Select the color for saving the scanned image.
    • Resolution: Select the resolution.
    Note:
    • ADF is set as the Document Source automatically.

    • On the Main Settings tab, you can also make the following settings.

      • Stitch Images: Select to stitch the images on the front and rear when scanning both sides of the original.

      • Rotate: Select to rotate the original clockwise and scan it.

      • Correct Document Skew: Select to correct the slant of the original.

      • Add or edit pages after scanning: Select to add different originals or edit (rotate, move, and delete) the scanned pages after scanning.

      • Skip Blank Pages: Select to skip blank pages if there are any in the originals.

      • Detect Double Feed: Select to display a warning when multiple originals are fed at the same time.

  4. Make other scan settings if necessary.

    • You can preview the scanned image of the first side of the first page of the originals. Load only the first page of your originals into the input tray and click the Preview button. The preview window opens, the previewed image is displayed, and the page is ejected from the scanner.
      Replace the ejected page together with the rest of the originals.
    • On the Advanced Settings tab, you can make image adjustments using detailed settings which are suitable for text documents, such as the following.
      • Remove Background: Select to remove the background from the originals.
      • Text Enhancement: Select to make blurred letters in the original clear and sharp.
      • Auto Area Segmentation: Select to make letters clear and images smooth when performing black and white scanning for a document that contains images.
      • Dropout: Select to remove the color specified from the scanned image, and then save it in grayscale or black and white. For example, you can erase marks or notes you wrote in the margins with color pen when scanning.
      • Color Enhance: Select to enhance the color specified for the scanned image, and then save it in grayscale or black and white. For example, you can enhance letters or lines that are in light colors.
    Note:

    Some items may not be available depending on other settings you made.

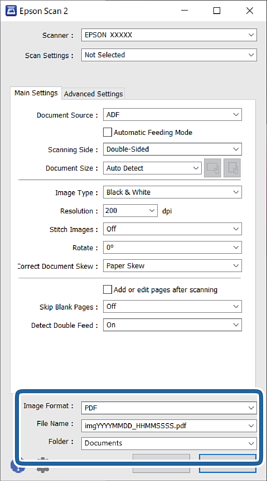
  5. Set the file saving settings.

    • Image Format: Select the save format from the list.
      You can make detailed settings for each save format except BITMAP and PNG. After selecting the save format, select Options from the list.
    • File Name: Check the save file name displayed.
      You can change settings for file name by selecting Settings from the list.
    • Folder: Select the save folder for the scanned image from the list.
      You can select other folder or create a new folder by selecting Select from the list.
  6. Click Scan.

    Note:
    • You can also start scanning by pressing the button on the scanner’s control panel.

    • To scan originals that are likely to jam, for example thin paper, enable Slow on the control panel to slow down the scanning speed.

    The scanned image is saved to the folder you specified.