If you notice a misaligned vertical lines, blurred images, or horizontal banding, adjust the print quality. If you want to adjust the print quality per paper, make this setting first. The setting value per paper is reset if you make this setting after adjusting per paper.
Select Maintenance on the printer's control panel.
To select an item, use the


 buttons, and then press the
OK button.
buttons, and then press the
OK button.
Select Print Quality Adjustment.
Follow the on-screen instructions to check the printer to improve print quality.
If a message is displayed recommending that you clean the print head, perform print head cleaning.
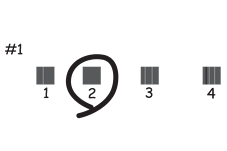
Follow the on-screen instructions to load paper and print the patterns for print head alignment
Examine the printed patterns and align the print head.