
If the Wi-Fi connection fails, check the following to see if there is a problem with the operation or settings for the connected device.
Solutions
Print out the network connection check report to see the issue and check the recommended solution.
See the following related information for details on reading the network connection check report.
If you want to check more information on the network settings, print a network status sheet.
Solutions
You may be able to solve the problem depending on the results of the check.
Double-click the Epson Printer Connection Checker icon on the desktop.
Epson Printer Connection Checker starts.
If there is no icon on the desktop, follow the methods below to start Epson Printer Connection Checker.
Follow the on-screen instructions to check.
If the printer name is not displayed, install a genuine Epson printer driver.
Checking if a genuine Epson printer driver is installed - Windows
When you have identified the problem, follow the solution displayed on the screen.
When you cannot solve the problem, check the following according to your situation.
The printer is not recognized over a network connection
Checking the Printer's Network Connection Status (Network Connection Report)
The printer is not recognized using a USB connection
The printer is recognized, but printing cannot be performed.
Cannot Print Even Though a Connection has been Established (Windows)
Solutions
Turn off the devices you want to connect to the network. Wait for about 10 seconds, and then turn on the devices in the following order; wireless router, computer or smart device, and then printer. Move the printer and computer or smart device closer to the wireless router to help with radio wave communication, and then try to make network settings again.
Solutions
After moving the computer or the smart device and the printer closer to the wireless router, turn off the wireless router, and then turn it back on.
Solutions
Make the connection settings again so that they match the new wireless router.
Solutions
When you are using multiple wireless routers at the same time or the wireless router has multiple SSIDs and devices are connected to different SSIDs, you cannot connect to the wireless router.
Example of connecting to different SSIDs
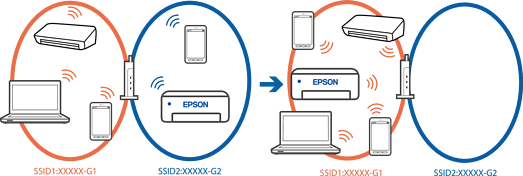
Example of connecting to SSIDs with a different frequency range

Connect the computer or smart device to the same SSID as the printer.
Check the SSID that the printer is connected to by printing out the network connection check report.
On all of the computers and smart devices you want to connect to the printer, check the name of the Wi-Fi or network you are connected to.
If the printer and your computer or smart device are connected to different networks, reconnect the device to the SSID that the printer is connected to.
Solutions
Most wireless routers have a separator function that blocks communication between devices within the same SSID. If you cannot communicate between the printer and the computer or smart device even if they are connected to the same network, disable the separator function on the wireless router. See the manual provided with the wireless router for details.
Solutions
If the IP address assigned to the printer is 169.254.XXX.XXX, and the subnet mask is 255.255.0.0, the IP address may not be assigned correctly.
Print the network connection report, and then check the IP address and the subnet mask assigned to the printer. To print a network connection report, select Settings > Network Settings > Connection Check.
Restart the wireless router or reset the network settings for the printer.
Solutions
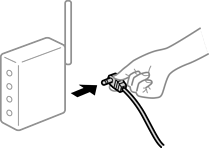
When you connect a device to the USB 3.0 port on a Mac, radio frequency interference may occur. Try the following if you cannot connect to wireless LAN (Wi-Fi) or if operations become unstable.
Place the device that is connected to the USB 3.0 port further away from the computer.
Solutions
Try accessing any website from your computer or smart device to make sure that your device's network settings are correct. If you cannot access any websites, there is a problem on the computer or smart device.
Check the network connection for the computer or smart device. See the documentation provided with the computer or smart device for details.
Solutions
When you connect the printer by Ethernet using devices that support IEEE802.3az (Energy Efficient Ethernet), the following problems may occur depending on the hub or router that you are using.
Connection becomes unstable, the printer is connected and disconnected again and again.
Cannot connect to the printer.
The communication speed becomes slow.
Follow the steps below to disable IEEE802.3az for the printer and then connect.
Remove the Ethernet cable connected to the computer and the printer.
When IEEE802.3az for the computer is enabled, disable it.
See the documentation provided with the computer for details.
Connect the computer and the printer with an Ethernet cable directly.
On the printer, print a network connection report.
Checking the Printer's Network Connection Status (Network Connection Report)
Check the printer's IP address on the network connection report.
On the computer, access Web Config.
Select Log in and enter the administrator password.
Launch a Web browser, and then enter the printer's IP address.
Select Network Settings > Wired LAN.
Select OFF for IEEE 802.3az.
Click Next.
Click OK.
Remove the Ethernet cable connected to the computer and the printer.
If you disabled IEEE802.3az for the computer in step 2, enable it.
Connect the Ethernet cables that you removed in step 1 to the computer and the printer.
If the problem still occurs, devices other than the printer may be causing the problem.