
You can make settings to save received faxes to the inbox and an external memory device from a specified sender or at a specified time. Saving a fax in a confidential box or the inbox allows you to confirm the contents of the received fax by viewing the fax on the printer's LCD screen before the printer prints the fax.
Before you use the feature to save received faxes at a specified time, make sure the printer's Date/Time and Time Difference settings are correct. Access the menu from Settings > General Settings > Basic Settings > Date/Time Settings.
As well as using the printer's control panel, you can use Web Config to make saving settings to receive faxes. Select the Fax tab > Save/Forward Settings > Conditional Save/Forward, select the number of the confidential box, and then select Edit and make the saving destination settings.
You can also print and/or forward received faxes at the same time. Make the settings on the Edit screen mentioned above.
Select Settings on the printer's control panel, and then select General Settings > Fax Settings.
Select Receive Settings > Save/Forward Settings > Conditional Save/Forward, and then tap  on an unregistered box under Conditional Save/Forward.
Select the Name box and enter the name you want to register.
Select the Condition(s) box to make a condition setting.
Select Save/Forward Destination and then make settings for the target destination, box, and/or an external memory device.
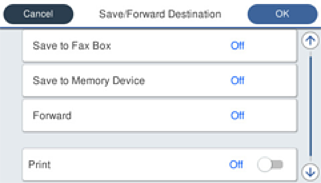
 Select Save to Fax Box.
 Tap Save to Fax Box to set this to On.
 Select the box in which to save the document.
Insert a memory device into the printer's external interface USB port.
Select Save to Memory Device.
Tap Save to Memory Device to set this to On.
Select the box in which to save the document.
Insert a memory device into the printer's external interface USB port.
Select Save to Memory Device.
Tap Save to Memory Device to set this to On.
 Check the message that is displayed, and then tap Create.
Received documents are saved in the printer's memory temporarily before the documents are saved in the memory device connected to the printer. Because a memory full error disables sending and receiving faxes, keep the memory device connected to the printer.
To print received faxes at the same time, tap Print to set this to On.
Select Close to complete the Save/Forward Destination Settings.
You can set the printer to send emails to people you want to notify about the results of saving faxes, when saving is complete. As necessary, select Email Notifications, set the processes, and then select the destination to which you want to send notifications from the contacts list.
Select OK until you return to the Save/Forward Settings screen to complete Conditional Save/Forward.
Select the registered box for which you made a condition setting, and then select Enable.
This completes making conditional saving settings to receive faxes. You can set Common Settings as necessary. For details, see the explanation for Common Settings in the Save/Forward Settings menu.