
You can save the scanned image to an external USB device.
Place the original.
Example: For standard paper
Insert a USB device into the scanner's external interface USB port.
Select Memory Device on the home screen on the control panel.
If the scanning menu screen is already displayed, go to the next step.
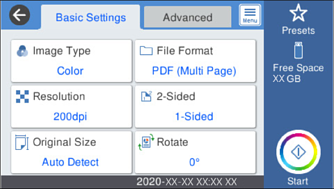
Set items on Basic Settings tab, such as the save format.
Basic Menu Options for Scanning to a Memory Device
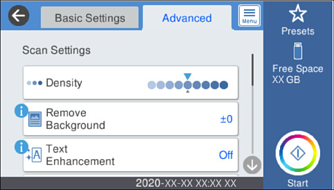
Select Advanced, and then check settings, and change them if necessary.
Advanced Menu Options for Scanning to a Memory Device
Select  to save your settings as a preset.
Select  , check the Scanner Settings, and then change them if necessary.
You can change the settings such as Slow or DFDS Function.
Tap  .
.
Scanned images are saved in the destination USB device.
After scanning, you may be prompted to save the settings as the User Settings.