Add printer using Mac OS X
If your printer is already displayed in Printers & Scanners (or Print & Scan, Print & Fax), select your printer, and click the – button to delete. Add the printer driver and the fax driver (for models with a fax function) according to the instructions below.
-
Select
 menu > System Preferences > Printers & Scanners (or Print & Scan, Print & Fax).
-
Click the + button.
-
Select Add Printer or Scanner.
-
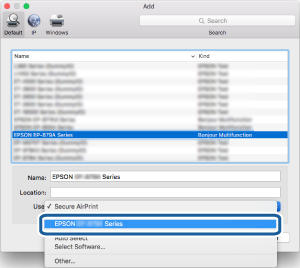
Select your Epson printer from the list.
-
Select the driver that named your printer.
Check the table below, to make sure you have selected the correct one.
Connection Method
Printer Driver
Fax Driver
USB
EPSON XXXXX
FAX XXXXX (USB)
Network
EPSON XXXXX
EPSON XXXXX -YYYYYY
FAX EPSON XXXXX (IP)
FAX EPSON XXXXX -YYYYYY (IP)
FAX ZZZ.ZZZ.ZZZ.ZZZ (IP)
*XXXXX = product name. YYYYYY = MAC address 6 digits. ZZZ.ZZZ.ZZZ.ZZZ = IP address.
-
Click Add.
Note:Once you have added driver(s), you do not need to add them again unless you change the connection method or use a different product. Make sure the product is turned on and properly connected to your computer using a USB or network connection. It may take a while to search for the fax driver. Wait until the fax driver is displayed in the list, and then add the fax driver using the same procedure.