Setting Up Standard TCP/IP Ports - Windows
Set up the Standard TCP/IP port, and create the print queue for network printing.
-
Open the devices and printers screen.
-
Windows 10Right-click the start button or press and hold it, and then select Control Panel > Hardware and Sound > Devices and Printers .
-
Windows 8.1/Windows 8Desktop > Settings > Control Panel > Hardware and Sound or Hardware > Devices and Printers.
-
Windows 7Click start > Control Panel > Hardware and Sound (or Hardware) > Devices and Printers.
-
Windows VistaClick start > Control Panel > Hardware and Sound > Printers.
-
Windows XPClick start > Control Panel > Printers and Other Hardware > Printers and Faxes.
-
-
Add a printer.
-
Windows 10/Windows 8.1/Windows 8Click Add printer, and then select The printer that I want isn't listed.
-
Windows 7Click Add printer.
-
Windows VistaClick Install Printer.
-
Windows XPClick Install Printer, and then click Next.
-
-
Add a local printer.
-
Windows 10/Windows 8.1/Windows 8Select Add a local printer or network printer with manual settings, and then click Next.
-
Windows 7/Windows VistaClick Add a local printer.
-
Windows XPSelect Local printer attached to this computer, and then click Next.
-
-
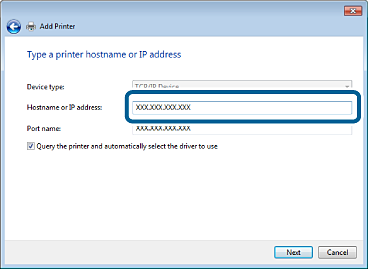
Select Create a new port, select Standard TCP/IP Port as the Port Type, and then click Next.
For Windows XP, click Next on the Add Standard TCP/IP Printer Port Wizard screen.

-
Enter the printer's IP address or printer name in Host Name or IP Address or Printer Name or IP Address, and then click Next.
Do not change Port name.
Click Continue when the User Account Control screen is displayed.
For Windows XP, click Done on the Standard TCP/IP Printer Port screen.
 Note:
Note:In case you specify the printer name on the network where the name resolution is available, IP address is tracked even if printer's IP address is changed by DHCP. You can confirm the printer name from network connection report. "EPSONXXXXXX" (XXXXXX is last 6 digits of the product's MAC address) is the default value.
-
Set the printer driver.
-
If the printer driver is already installed:Select Manufacturer and Printers. Click Next.
-
-
Follow the on-screen instructions.
For Windows XP, setup is complete. For Windows Vista and later, check the port configuration.