Setting the Network Priority - Windows
When connecting a computer to the printer by Wi-Fi Direct (Simple AP) while using the Internet over low-speed mobile data communication, you may not be able to access the Internet because the printer has a priority connection. Follow the steps below to lower the priority for Wi-Fi Direct (Simple AP) and increase the priority for mobile data communication.
-
Display the Windows network connection screen.
-
Windows 10Right-click the start button or press and hold it, and then select Control Panel > View network status and tasks > Change adapter settings.
-
Windows 8.1/Windows 8Desktop > Settings > Control Panel > Network and Internet > View network status and tasks > Change adapter settings.
-
Windows 7Click the start button, and then select Control Panel > View network status and tasks > Change adapter settings.
-
Windows VistaClick the start button, and then select Control Panel > View network status and tasks > Manage network connections.
-
Windows XPClick the start button, and then select Control Panel > Network and Internet Connections > Network Connections.
-
-
Select Wireless Network Connection (DIRECT-XXXXXXXX), right-click to display the menu, and then select Properties.
-
Select Internet Protocol Version 4 (TCP/IPv4) or Internet, and then click Properties.
Note:If you are using Windows Vista or later with IPv6, select Internet Protocol Version 6 (TCP/IPv6).
-
Click Advanced.
-
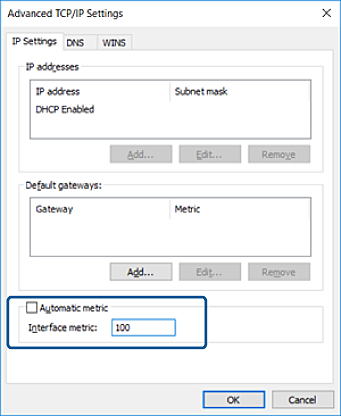
Clear Automatic metric, and then enter "100" in Interface metric.
-
Click OK to close the window.