Registering a Printer to Google Cloud Print (Using Control Panel)
By using Google Cloud Print, you can print even without installing the printer driver.
To register your printer to Google Cloud Print, you need the Chromebook or the device that can use the Chrome browser.
Also, you need a Google account. If you do not have a Google account, you need to create one first.
-
Load papers in the printer.
-
Connect your printer to the network.
For details of the network settings of your printer, see User's Guide or Administrator's Guide (only available for specific model) for your product.
-
Register your printer to Google Cloud Print by using the Chromebook or the device that can use the Chrome browser.
For details of the registration procedure, see the help for Google Cloud Print on Google website.
-
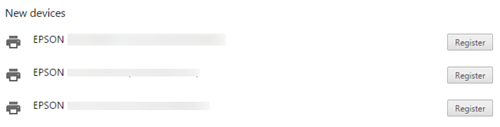
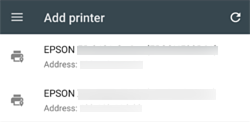
Confirm the printer what you want to register, and then click or tap Register.
When the printer name is only displayed, click or tap the printer name.
The followings are example.
-
From a computer :
-
From a smart device:
-
-
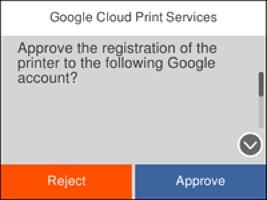
On the confirmation screen, click or tap Register.
-
On the printer's control panel, allow the registration request in the following way.
-
A printer with control panelRegister by following the message on the printer's control panel.
-
A printer without control panel
 light and
  light flash simultaneously. Press the
  button to allow the connection.
If you reject the connection, press the
button to allow the connection.
If you reject the connection, press the button.
-
The registration completion sheet is printed.