Scan over Network Using Epson Scan 2
You need to install the scanner driver (Epson Scan 2) on your computer to use printers on a network.
-
Install Epson Scan 2.
Download the software from the following website, and then install.
http://epson.sn > Additional Software
-
Start Epson Scan 2.
-
Windows 10Click the start button, and then select All Apps > EPSON > Epson Scan 2 > Epson Scan 2.
-
Windows 8.1/Windows 8Enter the application name in the search charm, and then select the displayed icon.
-
Windows 7/Windows Vista/Windows XPClick the start button, and select All Programs or Programs > EPSON > Epson Scan 2 > Epson Scan 2.
-
Mac OS XClick Go > Application > Epson Software > Epson Scan 2.
The Scanner Settings screen is displayed when you start Epson Scan 2 for the first time. If the Epson Scan 2 screen is displayed, select Settings from Scanner.
-
-
If Add and Delete are disabled, click Enable Editing, and then allow changes on the User Account Control window.
Note:Status and operations vary depending on the operation system and authority for the logged on user. For Mac OS X, you can edit if you click the key icon and enter the user name and password for an administrator.
-
Click Add.
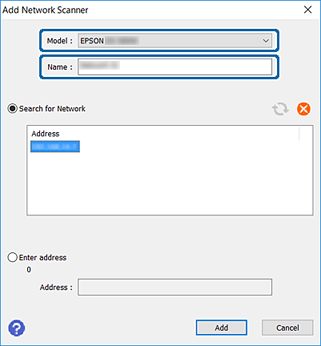
The Add Network Scanner screen is displayed.
Note:For Mac OS X, click +.
-
Select the printer you want to use from Model.
-
Enter the printer's registration name in Name.

-
Click the printer's IP address, and then click Add.
Important:You cannot search for a printer in a different network segment over the router. Select Enter address to enter the IP address directly.
-
Click OK on the Scanner Settings screen.
The Epson Scan 2 screen is displayed and you can test scanning.