Adjusting the Print Quality

If you notice a misaligned vertical lines, blurred images, or horizontal banding, adjust the print quality.

  1. Select Settings on the printer's control panel.

  2. Select Maintenance >Print Quality Adjustment.

  3. Follow the on-screen instructions to load paper and print the nozzle check pattern.

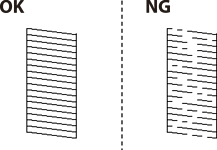
  4. Examine the printed pattern.

    • If there are broken lines or missing segments as shown in the "NG" pattern, the print head nozzles may be clogged. Select to clean the print head.
    • If you cannot see any broken lines or missing segments as in the following "OK" pattern, the nozzles are not clogged. Select to proceed to the next adjustment.
  5. Follow the on-screen instructions to print the patterns for print head alignment, and then align the print head.
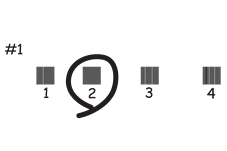
    • This pattern allows you to perform alignment if your printouts look blurry.
      Find and select the number for the most solid pattern.
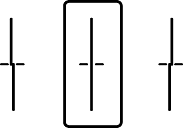
    • This pattern allows you to perform alignment if vertical ruled lines appear misaligned.
      Find and select the number for the pattern that has the least misaligned vertical line.
    • This pattern allows you to perform alignment if you see horizontal banding at regular intervals.
      Find and select the number for the least separated and overlapping pattern.