 You can also watch the procedure in the Web Movie Manuals. Access the following website.
https://support.epson.net/publist/vlink.php?code=NPD6930
If the nozzles are clogged, the printouts become faint, there is visible banding, or unexpected colors appear. If the nozzles are severely clogged, a blank sheet will be printed. When print quality has declined, first use the nozzle check feature to check if the nozzles are clogged. If the nozzles are clogged, clean the print head.
Do not open the front cover or turn off the printer during head cleaning. If the head cleaning is incomplete, you may not be able to print.
Head cleaning consumes ink and should not be performed more than necessary.
When ink is low, you may not be able to clean the print head.
If print quality has not improved after repeating nozzle check and head cleaning 3 times, wait for at least 12 hours without printing, and then run the nozzle check again and repeat the head cleaning if necessary. We recommend turning off the printer by using the  button. If print quality has still not improved, run Power Cleaning.
To prevent the print head from drying out, do not unplug the printer while the power is on.
You can check and clean the print head by using the printer's control panel.
Load A4-size plain paper in the printer.
Press the  button to turn off the printer.
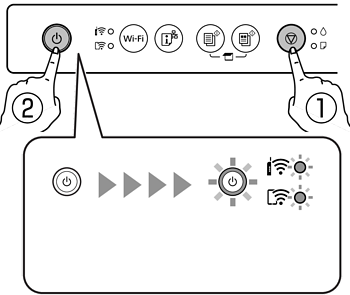
Turn the printer on while holding the  button down, and then release the buttons when the power light flashes.

The nozzle check pattern is printed.
It may take some time to start printing the nozzle check pattern.
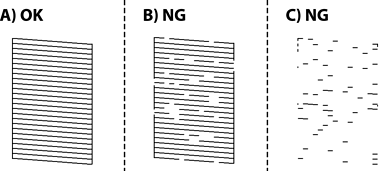
Check the printed pattern to see if the print head nozzles are clogged.

 button down for five seconds until the power light starts flashing.
It may take some time to start print head cleaning.
When the power light stops flashing, print a nozzle check pattern again. Repeat cleaning and printing the pattern until all lines are printed completely.
If print quality has not improved after repeating nozzle check and head cleaning 3 times, wait for at least 12 hours without printing, and then run the nozzle check again and repeat the head cleaning if necessary. We recommend turning off the printer by using the  button. If print quality has still not improved, run Power Cleaning.