
In some print cycles a very small amount of surplus ink may be collected in the maintenance box. To prevent ink leakage from the maintenance box, the printer is designed to stop printing when the absorbing capacity of the maintenance box has reached its limit. Whether and how often this is required will vary according to the number of pages you print, the type of material that you print and the number of cleaning cycles that the printer performs. When a message is displayed prompting you to replace the maintenance box, prepare a flat-head screwdriver and follow the on-screen instructions. The need for replacement of the box does not mean that your printer has ceased to operate in accordance with its specifications. The Epson warranty does not cover the cost of this replacement. It is a user-serviceable part.

When the maintenance box is full, you cannot print and clean the print head until it is replaced to avoid ink leakage. However, you can perform operations that do not use ink such as scanning.
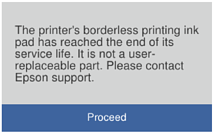
When the following screen is displayed, the part cannot be replaced by users. Contact Epson support.
Borderless printing is not available, but printing with a border is available.
Remove the new maintenance box from its package.
Do not touch the green chip on the side of the maintenance box. Doing so may prevent normal operation and printing.
A transparent bag for the used maintenance box is provided with the new maintenance box.
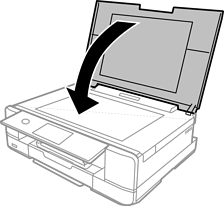
Open the document cover.

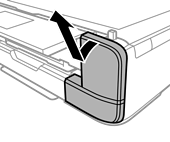
Open the control panel.

Loosen the screw with a flat-head screwdriver until the maintenance box cover comes off the printer.

Remove the maintenance box cover.
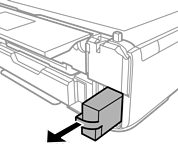
Remove the used maintenance box.
Do not touch the sections shown in the illustration. Doing so may prevent normal operation and you may get smeared with ink.

Put the used maintenance box in the transparent bag that came with the new maintenance box and seal the bag shut.
Insert the new maintenance box all the way into the printer.
Reattach the cover.
Insert the tabs on the cover into the slots, and then tighten the screw. If the cover is not installed correctly, ink may leak.

Close the document cover.
Select Done.
If the maintenance box cannot be recognized, try installing it again. If it is still not recognized, replace the maintenance box. Once a maintenance box has been installed in a printer it cannot be used with other printers.