
Depending on the ink levels, you may be able to continue printing for a while without replacing the ink cartridges.
If the CD/DVD tray has been inserted, remove the tray.
Do one of the following.
Remove the new ink cartridge from its package, and then tap Next.

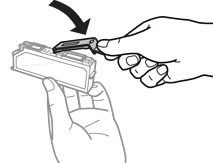
Make sure the cap is facing up, and then remove it.

Do not touch the sections shown in the illustration. Doing so may prevent normal operation and printing.

Open the scanner unit with the document cover closed.
Be careful not to trap your hand or fingers when opening or closing the scanner unit. Otherwise you may be injured.

Confirm the message, and then tap Start.
The ink cartridge holder moves to the replacement position. However, the ink cartridge holder may return after several minutes. In that case, repeat steps 2 to 6.
When replacing ink cartridges, replace them at the correct replacement position. If you replace these in the wrong position, a recognition error occurs. If an error occurs, reinsert these in the correct replacement position.
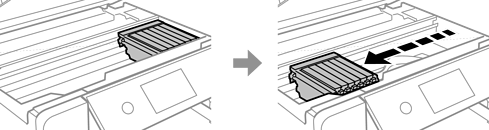
Push the tab to unlock the ink cartridge holder, and then remove the cartridge diagonally.
Replace ink cartridges one after another as soon as possible. If you replace two or more cartridges at a time or if replacement takes time, some ink may be consumed to guarantee printer performance.

Insert the ink cartridge diagonally into the cartridge holder and gently push it down until it clicks into place.

Close the scanner unit, and then tap Completed.
Follow the on-screen instructions.
If you remove the cartridge from the printer for later use or to dispose of it, make sure you put the cap back on the cartridge’s ink supply port to prevent ink from drying out or to prevent surrounding areas from getting smeared by ink. Place the cap securely until it clicks into place.
After installing the ink cartridge, the power light continues to flash while the printer is charging ink. Do not turn off the printer during ink charging. If the ink charging is incomplete, you may not be able to print.
Do not insert the CD/DVD tray until ink charging is complete.