
The procedure for creating the network folder varies depending on the environment. This section gives instructions for creating a network folder in the following environment.
Operating system: macOS 15
Location for creating shared folder: Desktop
Folder name: scan_folder
First, check the device name (computer name).
Log in to the computer where you want to create the network folder.
If you log in with a user account that does not have administrator privileges, you may be prompted to enter the administrator password. If you do not know the administrator password, please check with the computer administrator.
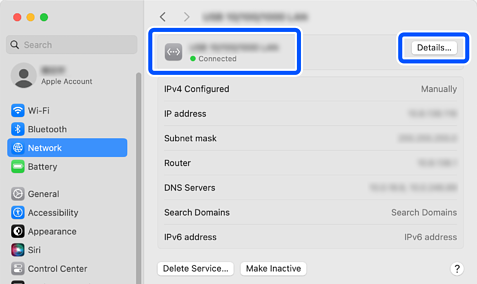
Make sure that the device name (computer name) does not contain double-byte characters. From the Apple menu, select System Settings > Network.
Select the connected network and click the Details button.
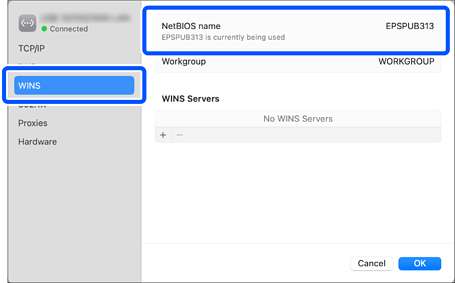
Select WINS, and check that the string displayed in NetBIOS name does not contain double-byte characters.
If there are double-byte characters in the device name, file saving may fail.
There should be no issues if the device name contains only single-byte characters. The device name will be used when registering the address in the printer’s contacts. Please write it down. Click OK to close the window.
Example: EPSPUB313
The folder path to register in the printer’s contacts will be as follows:
[Computer name (or IP address)]\[Network folder name]
In this example:
\\EPSPUB313\scan_folder
If the device name contains double-byte characters, use a computer that does not use double-byte characters or rename the device.
If you need to change the device name, make sure you check with your computer administrator in advance as it may affect computer management and access to resources.
Next, check your computer settings.
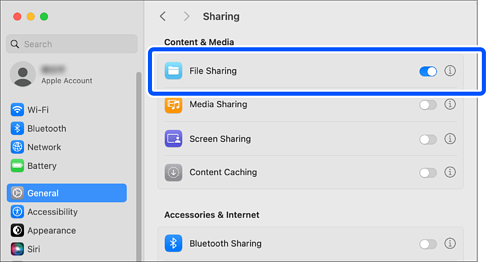
From the Apple menu, click System Settings > General > Sharing.
The sharing settings screen will appear.
Make sure File Sharing is turned on, and click the  icon to the right of File Sharing.
Click the Options button.
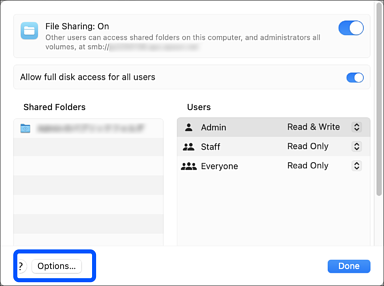
Make sure Share files and folders using SMB is enabled, and turn on the user account you want to share.
If prompted for a password, enter the account password and click OK.
Click Done to close the screen.
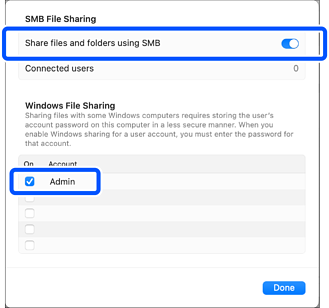
Click Done again on the File Sharing screen to close it.
Next, create the network folder and configure sharing for the user.
Create and name a folder on your desktop.
For the folder name, enter 1 to 12 alphanumeric characters. If the name exceeds 12 characters, you may not be able to access the folder depending on your environment.
Example: scan_folder
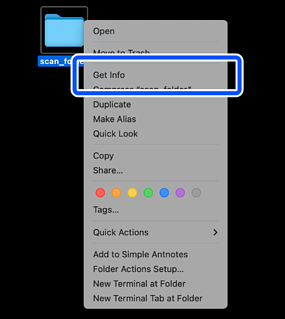
Right click the folder and select Get Info.
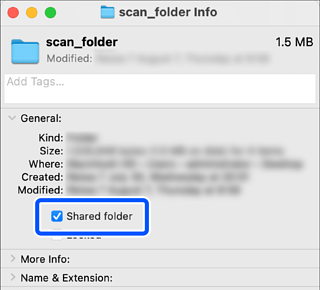
Check Shared folder.
Under Sharing & Permissions, make sure the user to whom you want to grant access has Read & Write privileges.
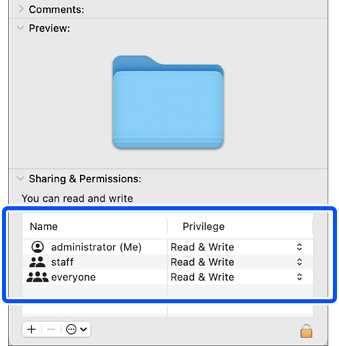
This completes creating and setting a network folder.