
You can configure settings to forward faxes received from a specified sender or at a specified time to only a destination.
When multiple conditions (Conditional Save/Forward) are set, they are processed in order, and the Conditional Save/Forward that matches first is executed.
You can enable forwarding to either a destination, an email address, a shared folder, your cloud account or another fax machine.
Before you set up forwarding, add the forwarding destinations to the contacts list or the cloud destination list. See the table below for details.
|
Destination Type |
Contacts |
Cloud Destination List |
|---|---|---|
|
email address |
✔ |
– |
|
shared folder
|
✔ |
– |
|
cloud account |
– |
✔ |
|
another fax machine |
✔ |
– |
Configure the appropriate settings based on the forwarding destination type.
Syncing with Cloud Directory Services
Using Your Cloud Service as a Destination for Forwarding Faxes
Before you use the feature to forward received faxes at a specified time, make sure the printer's Date/Time and Time Difference settings are correct. Access the menu from Settings > General Settings > Basic Settings > Date/Time Settings.
Color documents cannot be forwarded to another fax machine. They are processed as documents that failed to be forwarded.
As well as using the printer's control panel, you can use Web Config to configure settings for forwarding received faxes. Select the Fax tab > Save/Forward Settings > Conditional Save/Forward, select the number of the confidential box, and then select Edit and configure the forwarding destination settings.
You can also print and/or save received faxes at the same time. Configure the settings on the Edit screen mentioned above.
Select Settings on the printer's control panel, and then select General Settings > Fax Settings.
Select Receive Settings > Save/Forward Settings > Conditional Save/Forward, and then tap an unregistered box under Conditional Save/Forward.
If you want to change the settings for a registered box, tap  and change the settings.
Select the Name (Required) box and enter the name you want to register.
Select the Condition(s) box to make a condition setting.
Select Save/Forward Destination (Required), and then configure settings for a forwarding destination.
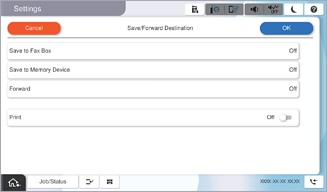
 Select Forward.
 Tap Forward to select On.
 Select Add Entry, and then select a forwarding destination from the contacts list or the cloud destination list.
To switch the lists, tap Cloud Destination List or Contacts.
 When you have finished selecting forwarding destinations, tap Close.
 Check that the forwarding destination you selected is correct, and then select Close.
 In Options When Forwarding Failed, select whether to print received documents or save them in the printer's Inbox when forwarding fails.
 Select OK.
When the Inbox or a confidential box is full, receiving faxes is disabled. You should delete the documents from the inbox once they have been checked. The number of documents that have failed to be forwarded is displayed on the  on the home screen, in addition to other unprocessed jobs.
To print received faxes at the same time, tap Print to select On.
Select OK to complete the Save/Forward Destination Settings.
You can configure the printer to send emails to people you want to notify about the results when the forwarding process is complete. As necessary, select Email Notifications, specify the processes, and then select the destination to which you want to send notifications from the contacts list.
Select OK until you return to the Save/Forward Settings screen to complete Conditional Save/Forward.
Select the registered box for which you made a condition setting, and then select Enable.
This completes making conditional saving settings to receive faxes. You can set Common Settings as necessary. For details, see the explanation for Common Settings in the Save/Forward Settings menu.
If you have selected a shared folder on a network, an email address, or a cloud account as the forwarding destination, we recommend that you test if you can send an image to the destination.
Select Scan > To Email or Scan > To Network Folder/FTP from the printer's control panel, select the destination, and then start scanning.
If you have selected a cloud account, you can perform a test by forwarding an image that has been saved in a fax box to the destination. Select Fax Box from the printer's control panel, and select a fax box in which an image has been saved. Select Send/Save > Forward(Cloud), select the destination, and then start forwarding.