Before Using the Printer
Part Names
Setup
Basic Operations
Cleaning
Troubleshooting
Appendix
Top > Setup > Connecting Cables
Connecting Cables
Connect the AC adapter and the interface cable to the connectors.
 WARNING:
Be sure to use the specified AC adapter [AC Adapter,C1 (Model: M235B)] only.
-
Remove the cover if it is attached.
 Removing the covers
-
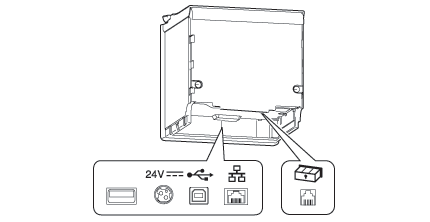
Connect the AC adapter and the interface cable to the connectors at the bottom of the printer.
-
When using the optional Wireless LAN unit, connect the unit to the USB connector.
-
When using the optional customer display (DM-D30), connect the USB cable to the USB connector.
-
Reattach the cover.
Attaching the covers
-
Connect the interface cable to the device.
-
Connect the AC cable plug to a power outlet.
 Note:WARNING:
-
Never insert the AC cable plug into a socket that does not meet the input voltage of the AC adapter. Doing so may result in damage to the printer.
-
Should a fault ever occur, immediately turn off the power to the printer and unplug the AC cable from the socket.
Before Using the Printer
Part Names
Setup
Basic Operations
Cleaning
Troubleshooting
Appendix
Top > Setup > Connecting Cables
Connecting Cables
Connect the AC adapter and the interface cable to the connectors.
WARNING:Be sure to use the specified AC adapter [AC Adapter,C1 (Model: M235B)] only.
-
Remove the cover if it is attached.
Removing the covers
-
Connect the AC adapter and the interface cable to the connectors at the bottom of the printer.
-
When using the optional Wireless LAN unit, connect the unit to the USB connector.
-
When using the optional customer display (DM-D30), connect the USB cable to the USB connector.
-
Reattach the cover.
Attaching the covers
-
Connect the interface cable to the device.
-
Connect the AC cable plug to a power outlet.
Note:WARNING:-
Never insert the AC cable plug into a socket that does not meet the input voltage of the AC adapter. Doing so may result in damage to the printer.
-
Should a fault ever occur, immediately turn off the power to the printer and unplug the AC cable from the socket.