Top > Insert or remove slip paper (all of the covers are closed)
Insert or remove slip paper (all of the covers are closed)
 | |
 |
Insert slip paper
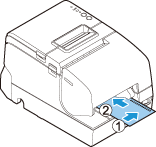
Set the paper so that the right edge of the paper contacts the paper guide on the right and insert the slip paper. Refer to the label affixed to the printer.
Once the paper has been inserted, the Slip LED stops flashing and glows.
 Note: Note:If the Slip LED does not stop flashing, download the Epson TM-H6000V Slip Paper Sensor Adjustment Tool (Windows only) from the following address. Use this tool to adjust the sensitivity of the slip paper sensor (A as illustrated in the figure). Refer to the Epson TM-H6000V Slip Paper Sensor Adjustment Tool manual for information on the adjustment procedure. https://support.epson.net/setupnavi/?PINF=swlist&MKN=TM-H6000V 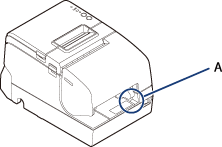 |
Insert validation paper
-
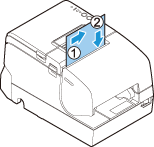
Insert the paper with the right paper edge against the right side of the paper guide at the printer top, and insert it as far as it will go.
-
Insert the paper straight down until the bottom edge of the paper touches the stopper.
Remove slip/validation paper
Refer to the following figure to remove the paper from the printer.
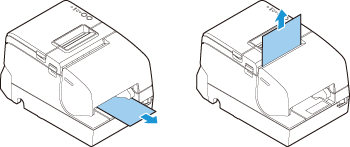
If the printer starts in this state after turning on the power, refer to the following figure to check if the paper path (B as illustrated in the figure) contains any pieces of paper. The printer is equipped with sensors along the paper path to detect paper (the locations circled in the figure). Some models are not equipped with the sensor located in the figure as indicated by the dotted circle.
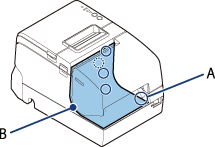
 Note: Note:If the Slip LED continues to flash after checking the paper path for pieces of paper and closing all covers, download the Epson TM-H6000V Slip Paper Sensor Adjustment Tool (Windows only) from the following address. Use this tool to adjust the sensitivity of the slip paper sensor (A as illustrated in the figure). Refer to the Epson TM-H6000V Slip Paper Sensor Adjustment Tool manual for information on the adjustment procedure. https://support.epson.net/setupnavi/?PINF=swlist&MKN=TM-H6000V |
Top > Insert or remove slip paper (all of the covers are closed)
Insert or remove slip paper (all of the covers are closed)
 | |
 |
Insert slip paper
Set the paper so that the right edge of the paper contacts the paper guide on the right and insert the slip paper. Refer to the label affixed to the printer.
Once the paper has been inserted, the Slip LED stops flashing and glows.

 Note: Note:If the Slip LED does not stop flashing, download the Epson TM-H6000V Slip Paper Sensor Adjustment Tool (Windows only) from the following address. Use this tool to adjust the sensitivity of the slip paper sensor (A as illustrated in the figure). Refer to the Epson TM-H6000V Slip Paper Sensor Adjustment Tool manual for information on the adjustment procedure. https://support.epson.net/setupnavi/?PINF=swlist&MKN=TM-H6000V  |
Insert validation paper
-
Insert the paper with the right paper edge against the right side of the paper guide at the printer top, and insert it as far as it will go.
-
Insert the paper straight down until the bottom edge of the paper touches the stopper.

Remove slip/validation paper
Refer to the following figure to remove the paper from the printer.

If the printer starts in this state after turning on the power, refer to the following figure to check if the paper path (B as illustrated in the figure) contains any pieces of paper. The printer is equipped with sensors along the paper path to detect paper (the locations circled in the figure). Some models are not equipped with the sensor located in the figure as indicated by the dotted circle.

 Note: Note:If the Slip LED continues to flash after checking the paper path for pieces of paper and closing all covers, download the Epson TM-H6000V Slip Paper Sensor Adjustment Tool (Windows only) from the following address. Use this tool to adjust the sensitivity of the slip paper sensor (A as illustrated in the figure). Refer to the Epson TM-H6000V Slip Paper Sensor Adjustment Tool manual for information on the adjustment procedure. https://support.epson.net/setupnavi/?PINF=swlist&MKN=TM-H6000V |
