
Some items may not be available depending on other settings you select.
Select the color of the output image.
When you select the following, the scanner detects the color of the originals automatically and saves the images using the detected colors.
Color/Grayscale/B&W
Converts the scanned image into 24-bit color, 8-bit gray, or monochrome (black and white binary). When this is selected, set the sensitivity to determine whether the original is grayscale or monochrome when scanning a non-color original.
Color/Black & White:
Converts the scanned image into 24-bit color or monochrome (black and white binary).
Color/Grayscale:
Converts the scanned image into 24-bit color or 8-bit gray.
The available image types may vary depending on the File Format you selected. See the following for more details.
Select the format in which to save the scanned image.
When you want to save as PDF, PDF/A, or TIFF, select whether to save all originals as one file (multi-page) or save each original separately (single page).
Compression Ratio:
Select how much to compress the scanned image.
PDF Settings:
When you have selected PDF as the save format setting, use these settings to protect PDF files.
To create a PDF file that requires a password when opening, set Document Open Password. To create a PDF file that requires a password when printing or editing, set Permissions Password.
Select the scanning resolution.
See the following for details on the file resolutions that can be selected.
Select the side of the original you want to scan when scanning from the ADF.
Document Direction:
Select the orientation of the original.
Binding(Original):
Select the binding direction of the original.
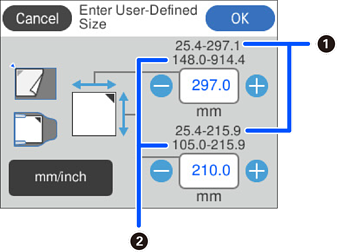
Select the size of the original you placed.
You can set a custom original size in User Defined.
The size of the original that you can define varies depending on the document source used to place the original. Enter the values based on the numbers displayed on the screen.
 : When the original is placed on the scanner glass
 : When the original is placed in the ADF
Document Direction:
Select the orientation of the original.
Crop Margins for Size "Auto":
Adjust the cropping area when selecting Auto Detect.
Select the orientation of the original.
The Document Direction setting is synced with the Scanning Side and Original Size settings. If you change the setting in any of them, the change is applied to all of them.
You can make blurred letters in the original clear and sharp. You can also reduce the offset or unevenness of the background.
Emphasize light letters / Remove background:
You can set the level of correction between text and background. When you move the slider closer to Emphasize light letters, the light letters in the scanned image are emphasized. When you move the slider closer to Remove background, the background color, pattern, wrinkles, or offset in the scanned image is removed.
Remove spot noise:
You can remove black dots in the background of the original that cannot be removed by lightening the background. You can adjust the level of the effect.
When you select this feature, it may also remove small dots as well as the black dots in the background.
Rotate the scanned image clockwise. Select the rotation angle depending on the original you want to scan.
Remove the background color of the originals from the scanned image.
To use this feature, the background color of the originals should be the lightest color in the originals, and should be uniform. This feature is not applied correctly if there are patterns in the background, or there are text or illustrations which are a lighter color than the background.
Remove the shadows of the original that appear in the scanned image.
Frame:
Remove the shadows at the edge of the original.
Correct skew in the scanned image.
This feature may not be able to correct documents that have been over skewed.
Select to skip any blank pages in the originals when scanning from the ADF.
If the result is not what you expected, adjust the detection level.
Some pages may be incorrectly skipped as blank pages.
After scanning once, you can scan additional originals using the same scan settings. If you have selected a multi-page file format, you can save all scanned images as a single file.
When scanning is complete, place the next original in the ADF or on the scanner glass, and then tap Start Scanning.
After scanning all of the originals, tap Last Original to save the image.
Use the scanner glass to scan the front and back of the ID card separately, then save the scans side by side as a single image.
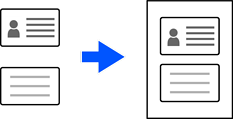
The scanned image is automatically cropped with a margin of approximately 3 mm (0.12 in.).
Follow the steps below to scan the front and back sides in order.
Layout:
Select the layout to be used for the front and back sides when saving the image.