
Use Web Config to configure OAuth 2.0 authentication for the email server.
Access Web Config.
Select Network tab > Email Server > Basic.
Select OAuth2 as the Authentication Method.
Select Microsoft Exchange Online as the Email service.
For personal use, select Outlook.com.
Sign in.
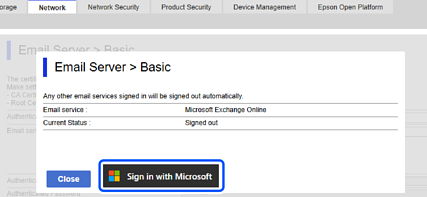
Click Sign In, and then click Sign in with Microsoft on the screen that appears.
Copy the authentication code displayed on the screen, and then click the URL displayed to open the authentication screen.
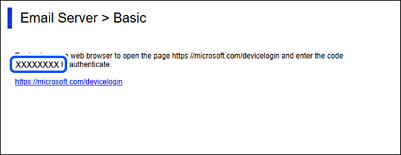
On the authentication code entry screen, enter the code you copied, and then click Next.
On the Microsoft sign in screen, enter your account details, and then click Next.
To sign in, your account must have at least the Cloud Application Administrator role assigned.
Enter the password and click Sign In.
If additional steps are required to sign in, follow the on-screen instructions.
On the requested permission screen, select "Consent on behalf of organization" and then click Accept.
When authentication is complete, a sign-in message is displayed and you can close the browser screen.
You can check the sign-in status on the Network tab > Email Server > Basic page in Web Config.
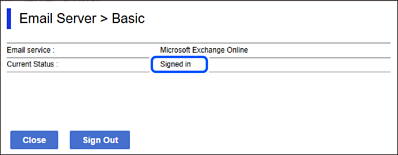
When the status shows Signed in, account information for OAuth 2.0 authentication is displayed.
Click OK to send the OAuth 2.0 authentication setting information to the product.