
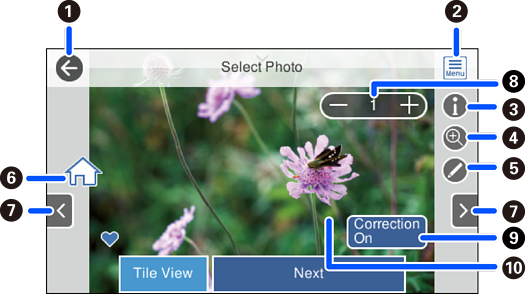
Select Single View on the select photo screen to display this screen. Here you can view enlarged photos one by one.
|
|
Returns to the previous screen. |
|
|
|
Displays the Select Photo Menu that allows you to select photos easily. |
|
|
|
Displays Exif information such as the shooting date or shutter speed. |
|
|
|
Enlarges a photo. Tap + to enlarge the photo and slide to display the part you want to check. Tap - to return to the original view. You can also pinch out to enlarge the image and pinch in to reduce it. Enlargement on this screen does not change the print result. |
|
|
|
You can crop the photo or apply color correction. |
|
|
|
Displays the home screen. |
|
|
|
Scrolls the screen to the right or left to display another photo. |
|
|
|
Sets the number of prints. Select - or +, or select the value to enter the number of prints using the on-screen keypad. |
|
|
|
Select to switch between Correction On and Correction Off. When Correction On is selected, the color correction adjusted on the Image Settings screen becomes visible on the screen. When Correction Off is selected, the color correction remains invisible, but the correction is applied on the printout. |
|
|
|
Tapping an empty part of the screen hides the icons. Tap the screen again to restore the icons. |
|


