|
Items |
Settings and Explanation |
|---|---|
|
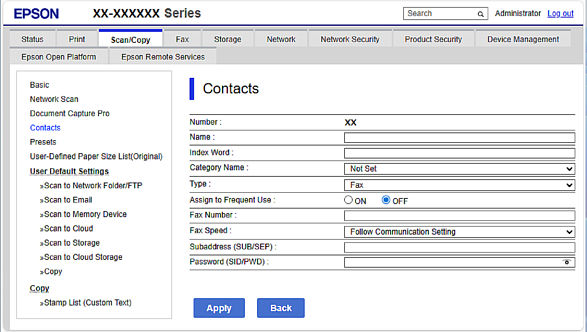
Name |
Enter the name that you want to display in the contacts list using 0 to 30 characters in Unicode (UTF-8). |
|
Index Word |
Enter words to associate with this entry for better results when searching for it. Enter 30 characters or less in Unicode (UTF-8). This field is optional. |
|
Category Name |
Select a category name. |
|
Type |
Select the type of the address that you want to register. |
|
Assign to Frequent Use |
Select to set the registered address as a frequently used address. When setting as a frequently used address, it is displayed on the top screen of fax and scan, and you can specify the destination without displaying the contacts. |
|
Items |
Settings and Explanation |
|---|---|
|
Select Line |
This item is displayed when IP Fax is activated or when one or more additional fax boards are installed. Select a line to use when sending a fax. |
|
Fax Number |
When any of the following conditions are true, enter 1 to 64 characters using 0-9 - * # or space.
|
|
SIP URI |
This item is displayed when IP Fax is activated. When you select IP-LAN in Select Line, enter 1 to 127 characters in ASCII (0x20 to 0x7E). However, you cannot use spaces or the following characters: "<>\^`{¦} |
|
Fax Speed |
Select a communication speed. |
|
Subaddress (SUB/SEP) |
Set the sub address that is appended when fax is sent. Enter 20 characters or less using 0-9, *, # or spaces. If you do not specify this, leave it blank. |
|
Password (SID/PWD) |
Set the password for the sub address. Enter 20 characters or less using 0-9, *, # or spaces. If you do not specify this, leave it blank. |
Displayed when one or more destinations have been registered in Contacts with Fax set as the Type.
|
Items |
Settings and Explanation |
|---|---|
|
Contact(s) for Group |
Click Select and select contacts from the available fax contacts displayed. You can select up to 200 destinations. |
|
Items |
Settings and Explanation |
|---|---|
|
Email Address |
Enter between 1 and 255 characters using A-Z a-z 0-9 ! # $ % & ' * + - . / = ? ^ _ { | } ~ @. |
|
Encryption Certificate |
Click File and select the encryption certificate file. |
Displayed when one or more destinations have been registered in Contacts with Email set as the Type.
|
Items |
Settings and Explanation |
|---|---|
|
Contact(s) for Group |
Click Select and select contacts from the available email contacts displayed. You can select up to 200 destinations. |
|
Items |
Settings and Explanation |
|---|---|
|
Save to |
\\“Folder path” Enter the location where the target folder is located. Enter from 1 to 253 characters in Unicode (UTF-8), omitting "\\". |
|
User Name |
Enter a user name using 30 characters or less in Unicode (UTF-8). However, avoid using control characters (0x00 to 0x1f, 0x7F). |
|
Password |
Enter a password using 70 characters or less in Unicode (UTF-8). However, avoid using control characters (0x00 to 0x1f, 0x7F). |
|
Items |
Settings and Explanation |
|---|---|
|
Secure Connection |
Select FTP or FTPS based on the file transfer protocol the FTP server supports. Select FTPS to allow the printer to communicate with security measures. |
|
Save to |
Enter the server address between 1 and 253 characters in Unicode (UTF-16) omitting "ftp://" or "ftps://". However, avoid using control characters (0x0000 to 0x001f 0x007F). |
|
User Name |
Enter a user name using 30 characters or less in Unicode (UTF-8). However, avoid using control characters (0x00 to 0x1f, 0x7F). If the server allows anonymous connections, enter a user name such as Anonymous or FTP. If you do not specify this, leave it blank. |
|
Password |
Enter a password using 70 characters or less in Unicode (UTF-8). However, avoid using control characters (0x00 to 0x1f, 0x7F). If you do not specify this, leave it blank. |
|
Connection Mode |
Select the connection mode from the menu. If there is a firewall between the printer and the FTP server, select Passive Mode. |
|
Port Number |
Enter the FTP server port number between 1 and 65535. |
|
Certificate Validation |
The FTP server's certificate is validated when this is enabled. This is available when FTPS is selected for Secure Connection. To use this feature, you need to import the CA Certificate to the printer. |
|
Items |
Settings and Explanation |
|---|---|
|
Secure Connection |
Select HTTP or HTTPS based on the hyper-text transfer protocol the HTTP server supports. Select HTTPS to allow the printer to communicate with security measures. |
|
Save to |
Enter the server address between 1 and 253 characters in Unicode (UTF-16) omitting “http://”or "https://". However, avoid using control characters (0x0000 to 0x001f, 0x007F). |
|
User Name |
Enter a user name using 30 characters or less in Unicode (UTF-8). However, avoid using control characters (0x00 to 0x1f, 0x7F). If the server allows anonymous connections, enter a user name such as Anonymous. If you do not specify this, leave it blank. |
|
Password |
Enter a password using 70 characters or less in Unicode (UTF-8). However, avoid using control characters (0x00 to 0x1f, 0x7F). If you do not specify this, leave it blank. |
|
Certificate Validation |
The HTTP server's certificate is validated when this is enabled. This is available when HTTPS is selected for Secure Connection. To use this feature, you need to import the CA Certificate to the printer. |
|
Proxy Server |
Select whether or not to use a proxy server to access an HTTP server. |