
Before Using the Scanner
Part Names
Setup
Basic Operations
Cleaning
Troubleshooting
Product Specifications
Appendix
Top > Part Names > Connectors
Connectors
The connectors are located on the back side of the scanner.
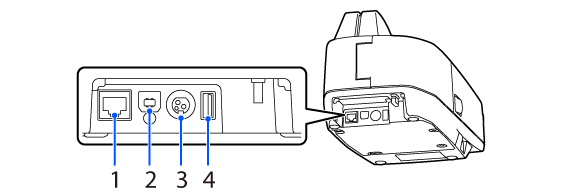
|
1 |
|
Ethernet connector |
Connect a LAN cable. |
|
2 |
|
USB connector (Type B) |
Connect a USB cable for network communication via USB. |
|
3 |
|
Power supply connector |
Connect a DC cable for the AC adapter. |
|
4 |
|
(not usable) |
The optional Wireless LAN Unit cannot be used. |
Before Using the Scanner
Part Names
Setup
Basic Operations
Cleaning
Troubleshooting
Product Specifications
Appendix
Top > Part Names > Connectors
Connectors
The connectors are located on the back side of the scanner.
|
1 |
|
Ethernet connector |
Connect a LAN cable. |
|
2 |
|
USB connector (Type B) |
Connect a USB cable for network communication via USB. |
|
3 |
|
Power supply connector |
Connect a DC cable for the AC adapter. |
|
4 |
|
(not usable) |
The optional Wireless LAN Unit cannot be used. |