
Before Using the Scanner
Part Names
Setup
Basic Operations
Cleaning
Troubleshooting
Product Specifications
Appendix
Top > Setup > Connecting the Scanner to a Host Device
Connecting the Scanner to a Host Device
Connecting via the USB Connector for Network Communication
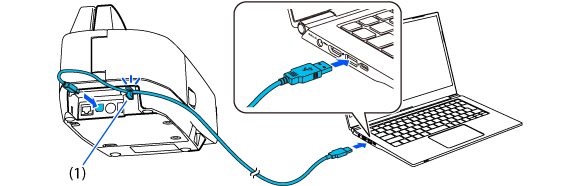
Connect the host computer to the scanner with the included USB cable.
 CAUTION:
-
Be sure to use the USB cable that is included with the scanner.
-
Pass the USB cable through the USB cable securing hook (1) as shown below to prevent the cable from falling off.
Connecting via the Ethernet Connector for Network Communication
Connect a LAN cable to your router or hub.
 Note
NoteConnect the scanner to the network before turning it on. Otherwise, the scanner will not function properly.

Before Using the Scanner
Part Names
Setup
Basic Operations
Cleaning
Troubleshooting
Product Specifications
Appendix
Top > Setup > Connecting the Scanner to a Host Device
Connecting the Scanner to a Host Device
Connecting via the USB Connector for Network Communication
Connect the host computer to the scanner with the included USB cable.
CAUTION:-
Be sure to use the USB cable that is included with the scanner.
-
Pass the USB cable through the USB cable securing hook (1) as shown below to prevent the cable from falling off.
Connecting via the Ethernet Connector for Network Communication
Connect a LAN cable to your router or hub.
NoteConnect the scanner to the network before turning it on. Otherwise, the scanner will not function properly.