
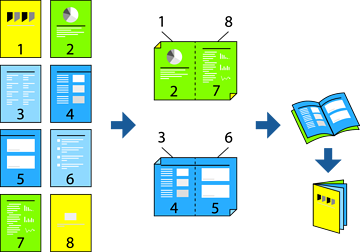
You can also print a booklet that can be created by re-ordering the pages and folding the printout.
This feature is not available with borderless printing.
If you do not use paper that is suitable for 2-sided printing, the print quality may decline and paper jams may occur.
Depending on the paper and the data, ink may bleed through to the other side of the paper.
You cannot perform manual 2-sided printing unless EPSON Status Monitor 3 is enabled. If EPSON Status Monitor 3 is disabled, access the printer driver window, click Extended Settings on the Maintenance tab, and then select Enable EPSON Status Monitor 3.
However, it may not be available when the printer is accessed over a network or is used as a shared printer.
Load paper in the printer .
Open the file you want to print.
Select Print or Print Setup from the File menu.
Select your printer.
Select Preferences or Properties to access the printer driver window.
Select the method of 2-Sided Printing on the Main tab.
On the printer driver's Settings tab, select Booklet.
Click OK.
Click Print Density, make the appropriate settings, and then click OK.
When setting Print Density, you can adjust print density according to the document type.
Printing may be slow depending on the combination of options selected for Select Document Type in the Print Density Adjustment window and for Quality on the Main tab.
Set the other items on the Main and More Options tabs as necessary, and then click OK.
Click Print.