About Epson ScanSmart
About This Help
Scanning and Saving Documents
Sending Invoice or Receipt Data to an Accounting Service
Exporting to QuickBooks Online
Exporting to QuickBooks Desktop (Windows only)
Exporting to Quicken
Exporting to TurboTax
Tips
Saving as Editable Files (Microsoft® Office)
Sending to a Cloud Service
Increasing the Rate of Character Recognition
Changing Settings
Changing the Scanner
Changing the Scan Settings
Customizing Actions
Changing the File Name Settings
Changing the JPEG, PDF, and TIFF Settings
Changing the Application to Scan From the Scanner
About Invoice/Receipt Manager
Managing Scanned Invoice or Receipt Data
Exporting and Importing the Invoice/Receipt Database
Saving Invoice or Receipt Data in CSV or Image Data Format
Activate Invoice/Receipt Manager
Importing Categories
Start the 30-Day Free Trial
Troubleshooting
Pressing the Scanner Button Does Not Start Scanning
Cannot Send to the Cloud Service
Cannot Access the Accounting Service
Cannot Import Invoice or Receipt Data
Scanning Speed is Slow
Files are Named with an Old Date
Cannot Export to QuickBooks Desktop
The License Key is Disabled
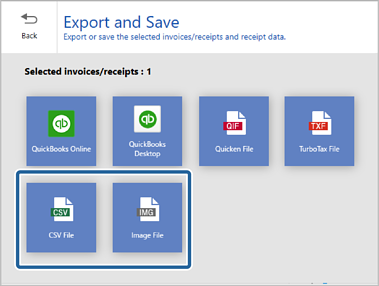
You can save invoice or receipt data in the following formats:
CSV
JPEG
PDF
1Load the invoices or receipts in your scanner.
See the User's Guide supplied with the scanner for details on loading originals.
2Press the button on the scanner to start scanning and open Epson ScanSmart.
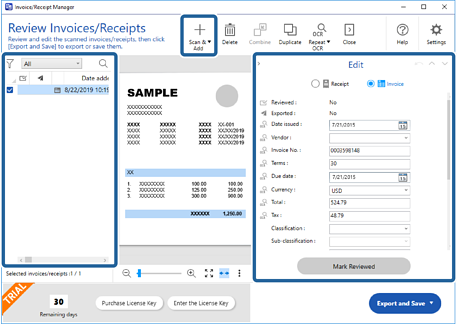
3Check the scanned images, and organize them if necessary.
4Click Next.
5Click Manage Invoices/Receipts on the Select Action window.
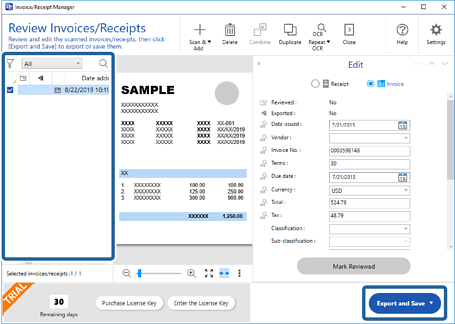
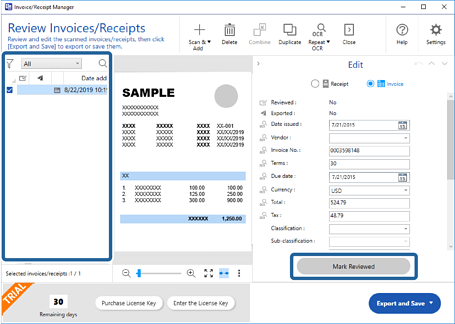
6Check the result and edit the automatically detected information if necessary.
Double-click the invoice or receipt from the list or click Edit and Review to display the Edit window.
If you want to add more scanned invoices or receipts, click Scan & Add.
Depending on the condition of your originals, OCR (Optical Character Recognition) may not recognize text correctly. Check the following.
The originals are placed straight.
The originals have clear text.
7Click Mark Reviewed.
Repeat editing and reviewing until all of the invoice or receipt data has been reviewed.
This is registered as accounting data. Be sure to check carefully that the numbers are correct.
After reviewing invoices or receipts, they are marked as reviewed in the list in the column.
You can sort and search the data from the column at the top of the list.
8Select the invoices or receipts you want to save from the list, and then click Export and Save.
9Select Save as CSV or Save as Image.
10Make the necessary settings, and then click Save.
The scanned invoices or receipts are saved in a specific folder.


 button on the scanner to start scanning and open
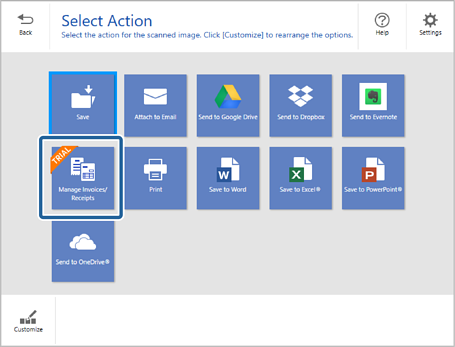
 column.