
Before Using the Printer
Part Names
Basic Operations
Setup
Cleaning
Troubleshooting
Product Specifications
Appendix
Top > Basic Operations > Installing or Replacing the Roll Paper
Installing or Replacing the Roll Paper
Follow the steps below to install or replace the roll paper.
 CAUTION:
-
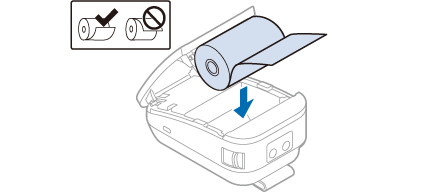
Make sure you use a specified roll paper type.
-
Before installing the roll paper, take up any slack in the roll paper by pulling its leading edge. If you install a slack roll paper, a paper jam or print quality problems may occur.
-
Before installing the roll paper, make sure that the roll paper is not deformed. Using a deformed roll paper will cause the printer to malfunction.
-
Turn on the printer.
-
Open the roll paper cover.
-
Remove the used roll paper core if any.
-
Install the roll paper in the correct direction.
-
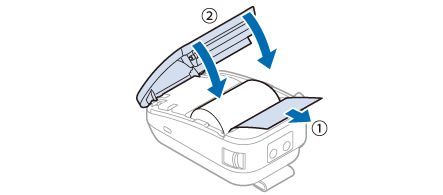
Pull out some paper, and close the roll paper cover.
 How to Open the Roll Paper Cover
If the printer is turned on, the roll paper is automatically cut.
Before Using the Printer
Part Names
Basic Operations
Setup
Cleaning
Troubleshooting
Product Specifications
Appendix
Top > Basic Operations > Installing or Replacing the Roll Paper
Installing or Replacing the Roll Paper
Follow the steps below to install or replace the roll paper.
CAUTION:-
Make sure you use a specified roll paper type.
-
Before installing the roll paper, take up any slack in the roll paper by pulling its leading edge. If you install a slack roll paper, a paper jam or print quality problems may occur.
-
Before installing the roll paper, make sure that the roll paper is not deformed. Using a deformed roll paper will cause the printer to malfunction.
-
Turn on the printer.
-
Open the roll paper cover.
-
Remove the used roll paper core if any.
-
Install the roll paper in the correct direction.
-
Pull out some paper, and close the roll paper cover.
How to Open the Roll Paper Cover
If the printer is turned on, the roll paper is automatically cut.