
Before Using the Printer
Part Names
Basic Operations
Setup
Cleaning
Troubleshooting
Product Specifications
Appendix
Top > Basic Operations > Charging the Battery
Charging the Battery
Charging the Battery using the Included USB Cable
 CAUTION:
-
When charging the battery, install the battery to the printer.
-
Charge the battery in an environment of approximately 0 to 40 °C {32 to 104 °F}.
 Note:
Note:-
When the printer is used for the first time, the battery needs to be charged for approximately 2.5 hours.
-
Use a USB power adapter or USB port that complies with the USB Type-C Standard.
-
Only USB Type-C standard power mode is supported. The charging time varies depending on the power supply capability and settings of the USB power adapter and port.

-
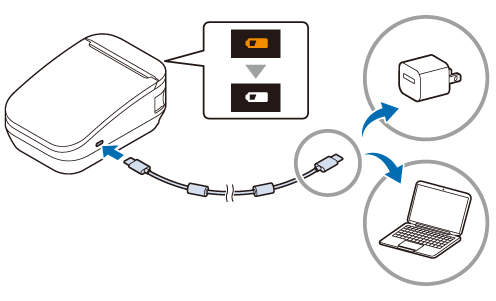
Connect the included USB cable to the printer.
-
Connect the USB cable to a commercially available USB power adapter or computer.
-
The charge LED lights up when charging starts.
-
The charge LED turns off when charging is complete.
-
Disconnect the USB cable from the printer.
If the remaining battery charge is almost full, charging will not start.
Check the battery LED for remaining battery charge.
Charge LED
This LED indicates the battery charge status.
 |
The battery is charging |
 (Flashing) |
Battery charge error |
 |
Battery is fully charged or not being charged |


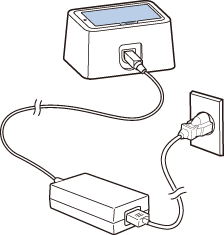
Charging the Battery with the Optional Battery Charger
By using the optional battery charger, the battery removed from the printer can be charged alone.
-
OT-SB80II
-
OT-CH80II
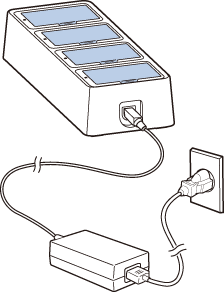
For more information, see the User's Manual of the battery charger from the link below.
https://support.epson.net/publist/bsredirect.php?code=M00151101
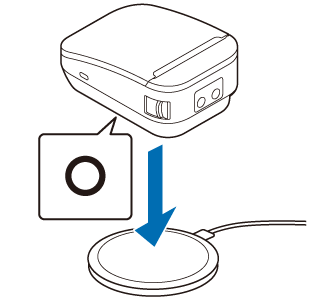
Wireless Charging
The battery can be charged using a commercially available wireless charger that supports the Qi standard.
Place the printer so that the ![]() symbol (wireless charging position) on the printer overlaps the position indicated in the wireless charger manual.
symbol (wireless charging position) on the printer overlaps the position indicated in the wireless charger manual.
The charge LED lights up when charging starts. If the charge LED does not light up, reposition the printer in the correct position.
Check the battery LED for charge level.
Precautions for Wireless Charging
-
For the procedure of wireless charging, refer to the manual of the wireless charger.
-
Remove the belt clip when charging wirelessly.
-
When charging wirelessly, remove the optional belt strap, shoulder strap, and soft case.
-
When charging, be sure to correctly align the printer's wireless charging position with that of the wireless charger.
-
Depending on the wireless charger used, the charging position may not match and charging may not be performed properly.
-
Charging may stop if the temperature of the printer exceeds a certain level during charging.
-
If you charge wirelessly while the printer is on, the charge LED will stay on.
-
Be careful not to allow foreign objects to get between the printer and the wireless charger. Foreign objects may generate heat or cause damages, resulting in improper charging.
-
Disconnect the USB cable when charging wirelessly. Wireless charging will not work if the printer is connected to a computer or other device.
-
The charging time with wireless charging is as follows.
3 to 6 hours (depending on the specifications of your wireless charger)
Before Using the Printer
Part Names
Basic Operations
Setup
Cleaning
Troubleshooting
Product Specifications
Appendix
Top > Basic Operations > Charging the Battery
Charging the Battery
Charging the Battery using the Included USB Cable
CAUTION:-
When charging the battery, install the battery to the printer.
-
Charge the battery in an environment of approximately 0 to 40 °C {32 to 104 °F}.
Note:-
When the printer is used for the first time, the battery needs to be charged for approximately 2.5 hours.
-
Use a USB power adapter or USB port that complies with the USB Type-C Standard.
-
Only USB Type-C standard power mode is supported. The charging time varies depending on the power supply capability and settings of the USB power adapter and port.
-
Connect the included USB cable to the printer.
-
Connect the USB cable to a commercially available USB power adapter or computer.
-
The charge LED lights up when charging starts.
-
The charge LED turns off when charging is complete.
-
Disconnect the USB cable from the printer.
If the remaining battery charge is almost full, charging will not start.
Check the battery LED for remaining battery charge.
Charge LED
This LED indicates the battery charge status.
|
|
The battery is charging |
|
(Flashing) |
Battery charge error |
|
|
Battery is fully charged or not being charged |
Charging the Battery with the Optional Battery Charger
By using the optional battery charger, the battery removed from the printer can be charged alone.
-
OT-SB80II
-
OT-CH80II
For more information, see the User's Manual of the battery charger from the link below.
https://support.epson.net/publist/bsredirect.php?code=M00151101
Wireless Charging
The battery can be charged using a commercially available wireless charger that supports the Qi standard.
Place the printer so that the ![]() symbol (wireless charging position) on the printer overlaps the position indicated in the wireless charger manual.
symbol (wireless charging position) on the printer overlaps the position indicated in the wireless charger manual.
The charge LED lights up when charging starts. If the charge LED does not light up, reposition the printer in the correct position.
Check the battery LED for charge level.
Precautions for Wireless Charging
-
For the procedure of wireless charging, refer to the manual of the wireless charger.
-
Remove the belt clip when charging wirelessly.
-
When charging wirelessly, remove the optional belt strap, shoulder strap, and soft case.
-
When charging, be sure to correctly align the printer's wireless charging position with that of the wireless charger.
-
Depending on the wireless charger used, the charging position may not match and charging may not be performed properly.
-
Charging may stop if the temperature of the printer exceeds a certain level during charging.
-
If you charge wirelessly while the printer is on, the charge LED will stay on.
-
Be careful not to allow foreign objects to get between the printer and the wireless charger. Foreign objects may generate heat or cause damages, resulting in improper charging.
-
Disconnect the USB cable when charging wirelessly. Wireless charging will not work if the printer is connected to a computer or other device.
-
The charging time with wireless charging is as follows.
3 to 6 hours (depending on the specifications of your wireless charger)