Introduction to Your LABELWORKS Printer
Setting Up the Printer
Using the Label Printer With Your Mobile Device
Using the Printer With Your Windows® Computer
Applying Your Labels
Cleaning the Printer
Solving Problems
Technical Specifications
Notices
Top > Setting Up the Printer > Preparing the power supply
Preparing the power supply
This product operates on batteries or with the dedicated AC adapter.
Using with the AC adapter (AST1116Z2-1)
 CAUTION CAUTIONAlways use the specified AC adapter. Do not unplug the AC adapter while the product is in operation, otherwise printing may not be successful. |
-
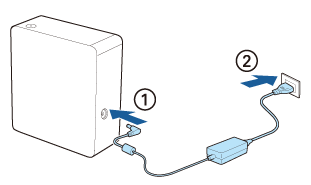
Connect the AC adapter to the printer, and plug the power cable into the outlet.
Using on batteries
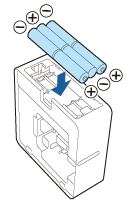
The printer requires 6 AA alkaline batteries.
|
CAUTION Make sure the power is off before you install the battery. |
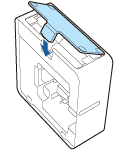
-
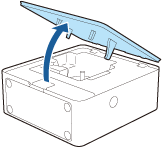
Open the tape cover.
-
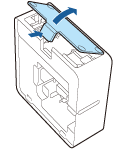
Press the tab and open the battery cover.
-
Insert the batteries with the + and – ends facing as shown.
-
Replace the battery cover.
Introduction to Your LABELWORKS Printer
Setting Up the Printer
Using the Label Printer With Your Mobile Device
Using the Printer With Your Windows® Computer
Applying Your Labels
Cleaning the Printer
Solving Problems
Technical Specifications
Notices
Top > Setting Up the Printer > Preparing the power supply
Preparing the power supply
This product operates on batteries or with the dedicated AC adapter.
Using with the AC adapter (AST1116Z2-1)
|
CAUTION Always use the specified AC adapter. Do not unplug the AC adapter while the product is in operation, otherwise printing may not be successful. |
-
Connect the AC adapter to the printer, and plug the power cable into the outlet.
Using on batteries
The printer requires 6 AA alkaline batteries.
|
CAUTION Make sure the power is off before you install the battery. |
-
Open the tape cover.
-
Press the tab and open the battery cover.
-
Insert the batteries with the + and – ends facing as shown.
-
Replace the battery cover.