
Before printing on the PVC ID card, see the PVC ID card handling precautions.
Do not insert the disc/ID card tray while the printer is operating. This may damage the printer.
Do not insert the disc/ID card tray until you send the print data and the  light turns on. Otherwise, an error occurs and the tray is ejected.
We recommend using EPSON Photo+ for easy PVC ID card printing. See the related information for more details on printing on PVC ID cards.
When the output tray is ejected, check that there is no paper on the tray, and then close it by pushing it with your hand.
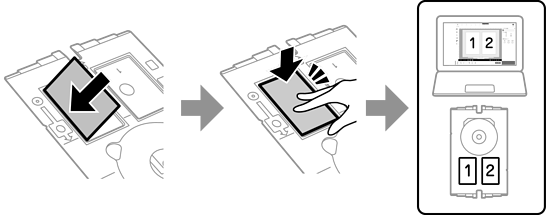
Send print data from a computer.
When the light turns on, follow the instructions below to load the card.
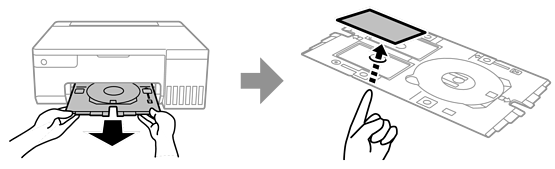
Remove the disc/ID card tray stored under the output tray.
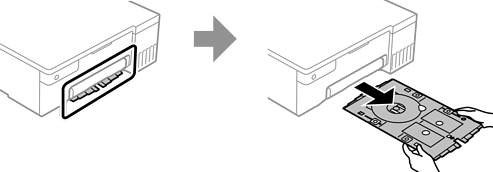
Check that the disc/ID card tray is clean. If it is dirty, clean it using a soft, clean cloth that has been dampened with water.
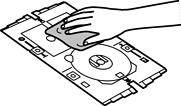
By making sure the disc/ID card tray is clean, you can prevent the card and your hands from getting dirty when you set the PVC ID card, and you are more likely to get the intended print result.
Place the PVC ID card in the disc/ID card tray with the printable side facing-up. Place it in slots 1 or 2 on the disc/ID card tray or in both according to the print data.
Insert the disc/ID card tray with the PVC ID card side of the tray toward the printer. Insert until the marks on the disc/ID card tray are aligned with the front of the printer.
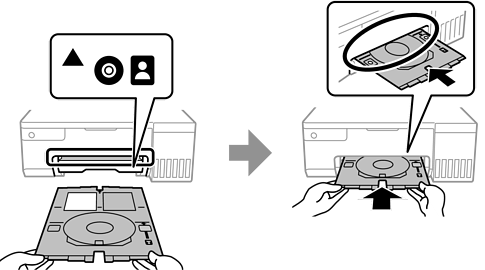
You may feel slight friction when inserting the tray into the printer. This is normal and you should continue to insert it horizontally.
Press the  button to start printing.
When the disc/ID card tray is automatically ejected after printing is complete, pull it out and remove the PVC ID card.
To print the back of the PVC ID card, follow the on-screen instructions and then repeat steps 5 to 9. When you have finished printing, go to the next step.
Wipe the disc/ID card tray with a damp cloth that has been wrung out thoroughly.
Insert the disc/ID card tray back into the slot under the output tray.
After printing is finished, make sure you remove the disc/ID card tray. If you do not remove the disc/ID card tray and turn the printer on or off, or run head cleaning, the tray will strike the print head and may cause the printer to malfunction.