-
-
-
-
-
Network Service and Software Information
-
Application for Scanning Documents and Images (Epson Scan 2)
-
Application for Configuring Scanning Operations from the Control Panel (Epson Event Manager)
-
Application for Quick and Fun Printing from a Computer (Epson Photo+)
-
Application for Easily Operating the Printer from a Smart device (Epson Smart Panel)
-
Application for Updating Software and Firmware (Epson Software Updater)
-
-
-
Replacing Ink Cartridges
Be careful not to trap your hand or fingers when opening or closing the scanner unit. Otherwise you may be injured.
If you replace the ink cartridges while copying, the originals may move out of place. Press the  button to cancel and replace the originals.
-
Do one of the following.
To select an item, use the


 buttons, and then press the
OK button.
-
When prompted to replace ink cartridgesCheck which ink cartridge needs to be replaced, and then press the OK button. Confirm the message, select Replace now on the home screen.
-
When replacing ink cartridges before they are expendedSelect Maintenance > Ink Cartridge(s) Replacement on the home screen.
-
-
When replacing the black ink cartridge, gently shake the new black ink cartridge four or five times and then remove it from its package. When replacing other color cartridges, remove the new color cartridges from their package without shaking.
 Important:
Do not shake cartridges after opening the package, as they may leak.
-
Remove only the yellow tape.
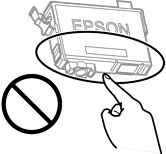
 Important:
Do not touch the sections shown in the illustration. Doing so may prevent normal operation and printing.

-
Open the scanner unit with the document cover closed.

-
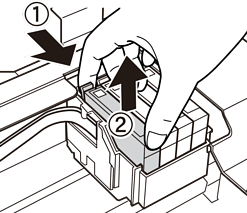
Squeeze the tab on the ink cartridge and pull it straight up. If you cannot remove the ink cartridge, pull it firmly.

-
Insert the new ink cartridge, and then press it down firmly.

-
Close the scanner unit.
For safety, the scanner unit is closed in two steps.
 Note:
Note:The scanner unit cannot be opened from the position shown below. Close it completely before opening it.

-
Press the
 button.
Ink charging starts.
Important:Do not turn off the printer during ink charging. If the ink charging is incomplete, you may not be able to print.
