Before Using the Printer
Part Names
Setup
Basic Operations
Appendix
Top > Setup > Connecting the Charging Cable for the Tablet
Connecting the Charging Cable for the Tablet
Follow the steps below to connect the charging cable for the tablet.
-
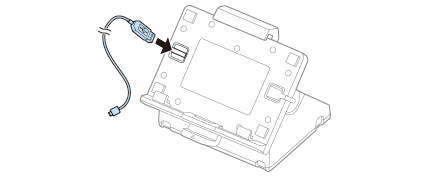
Insert the charging cable through the cable hole.
-
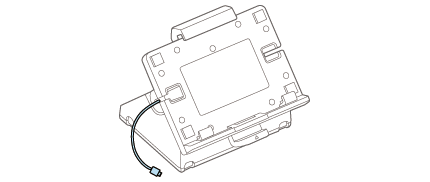
Route the cable through the slit on the side of the holder.
-
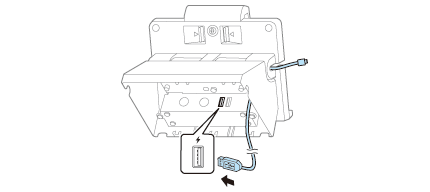
Connect the charging cable to the USB connector.
-
Make sure you use the genuine cable for the tablet, smartphone, or USB device you are using.
-
Depending on how the device is being used, it may not charge to 100%.
-
It may take a few seconds before charging starts as the device searches for the most suitable amperage.
-
Charging may not be performed depending on the device's charging specifications.
-
Charging stops if it exceeds the rating for the USB connector.
-
If the safety function is activated while using two ports at the same time, disconnect one of the connected devices. Charging continues when one of the devices is disconnected.
-
It may be hard to disconnect some types of USB cable. Do not forcibly pull the cable, or the USB connector and USB cable may be damaged. Contact your dealer if you encounter the trouble.
-
You can use either of the USB connectors.
-
The USB connectors are for power supply only.
-
Wind the remaining charging cable around the cable clamp. Do not wind the DC cable around the cable clamp.

-
Attach other options, such as a scanner, to the USB connector.
-
Attach the bottom cover.
 Note:
Note:There are two cable holes on the right and left of the stand.
 CAUTION:Note:
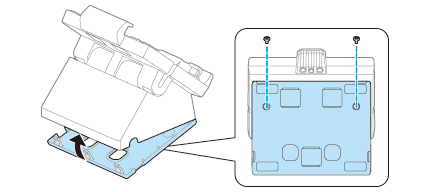
Before Using the Printer
Part Names
Setup
Basic Operations
Appendix
Top > Setup > Connecting the Charging Cable for the Tablet
Connecting the Charging Cable for the Tablet
Follow the steps below to connect the charging cable for the tablet.
-
Insert the charging cable through the cable hole.
-
Route the cable through the slit on the side of the holder.
-
Connect the charging cable to the USB connector.
-
Make sure you use the genuine cable for the tablet, smartphone, or USB device you are using.
-
Depending on how the device is being used, it may not charge to 100%.
-
It may take a few seconds before charging starts as the device searches for the most suitable amperage.
-
Charging may not be performed depending on the device's charging specifications.
-
Charging stops if it exceeds the rating for the USB connector.
-
If the safety function is activated while using two ports at the same time, disconnect one of the connected devices. Charging continues when one of the devices is disconnected.
-
It may be hard to disconnect some types of USB cable. Do not forcibly pull the cable, or the USB connector and USB cable may be damaged. Contact your dealer if you encounter the trouble.
-
You can use either of the USB connectors.
-
The USB connectors are for power supply only.
-
Wind the remaining charging cable around the cable clamp. Do not wind the DC cable around the cable clamp.
-
Attach other options, such as a scanner, to the USB connector.
-
Attach the bottom cover.
Note:There are two cable holes on the right and left of the stand.
CAUTION:Note: