Top > Setup > Attaching the Tablet
Attaching the Tablet
Follow the steps below to attach the tablet to the stand.
-
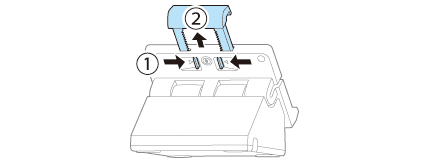
Pinch the back lever and pull up the slider.
-
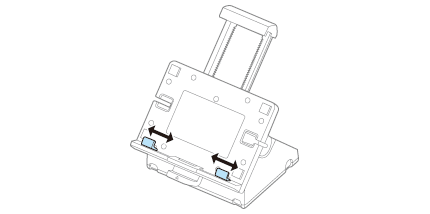
Adjust the bottom arms according to the width of the tablet.
-
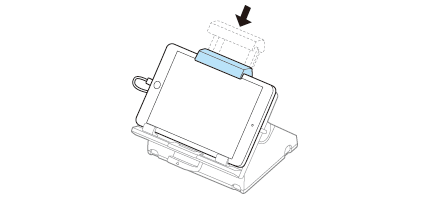
Place the tablet and push the slider down.
-
Adjust the bottom arm so that it does not interfere with the volume or power buttons on the bottom edge of the tablet.
-
Be sure to push the slider so that it is not loose against the tablet.
-
Do not apply too much weight to the tablet when installing it, otherwise the tablet may be damaged.
-
When connecting the cable to the tablet, make sure the cable is a little slack so that tension is not applied to the cable. If tension is applied to the cable, the connector could be damaged. Make sure you periodically check that the charging cable is not damaged.

-
When the connector for the tablet's docking station is in the center of the long edge, the slider or protruding sections on the tablet stand may interfere and you may not be able to connect the cable.
-
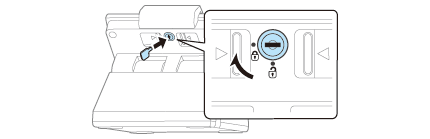
Lock to secure the tablet.
 CAUTION:
 Note:
Note:When a plate lock is installed, place the tablet so that the plate lock fits the hole on the holder.
 Note:
Note:You can attach a security wire if needed.
Top > Setup > Attaching the Tablet
Attaching the Tablet
Follow the steps below to attach the tablet to the stand.
-
Pinch the back lever and pull up the slider.
-
Adjust the bottom arms according to the width of the tablet.
-
Place the tablet and push the slider down.
-
Adjust the bottom arm so that it does not interfere with the volume or power buttons on the bottom edge of the tablet.
-
Be sure to push the slider so that it is not loose against the tablet.
-
Do not apply too much weight to the tablet when installing it, otherwise the tablet may be damaged.
-
When connecting the cable to the tablet, make sure the cable is a little slack so that tension is not applied to the cable. If tension is applied to the cable, the connector could be damaged. Make sure you periodically check that the charging cable is not damaged.
-
When the connector for the tablet's docking station is in the center of the long edge, the slider or protruding sections on the tablet stand may interfere and you may not be able to connect the cable.
-
Lock to secure the tablet.
CAUTION:Note:When a plate lock is installed, place the tablet so that the plate lock fits the hole on the holder.
Note:You can attach a security wire if needed.