
Before Using the Printer
Part Names
Setup of the Tablet
Setup of the Printer
Basic Operations
Cleaning
Troubleshooting
Using the Optional Products
Appendix
Top > Part Names > Bottom
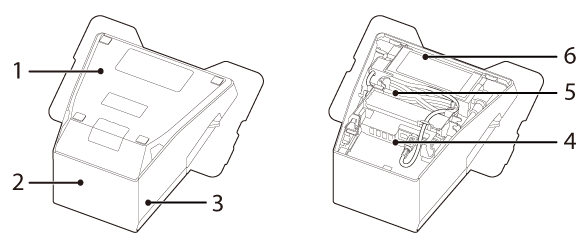
Bottom
|
1 |
Bottom cover |
Remove this cover when connecting interface cables to the connectors inside the printer. |
|
2 |
Rear cover |
Remove this cover when connecting interface cables to the connectors inside the printer. |
|
3 |
Side cover |
Remove this cover when connecting interface cables to the connectors inside the printer. |
|
4 |
Connectors |
For connecting various devices to the printer. |
|
5 |
DC cable |
The AC adapter supplies power to the printer through this cable. |
|
6 |
AC adapter |
Supplies power to the printer. Be sure to use the specified AC adapter (PS-180 (Model: M159E). Connection to an improper power source may cause fire. |
Before Using the Printer
Part Names
Setup of the Tablet
Setup of the Printer
Basic Operations
Cleaning
Troubleshooting
Using the Optional Products
Appendix
Top > Part Names > Bottom
Bottom
|
1 |
Bottom cover |
Remove this cover when connecting interface cables to the connectors inside the printer. |
|
2 |
Rear cover |
Remove this cover when connecting interface cables to the connectors inside the printer. |
|
3 |
Side cover |
Remove this cover when connecting interface cables to the connectors inside the printer. |
|
4 |
Connectors |
For connecting various devices to the printer. |
|
5 |
DC cable |
The AC adapter supplies power to the printer through this cable. |
|
6 |
AC adapter |
Supplies power to the printer. Be sure to use the specified AC adapter (PS-180 (Model: M159E). Connection to an improper power source may cause fire. |