
Before Using the Printer
Part Names
Setup of the Tablet
Setup of the Printer
Basic Operations
Cleaning
Troubleshooting
Using the Optional Products
Appendix
Top > Using the Optional Products > OT-WH30SL (Wall Hanging Bracket Set)
OT-WH30SL (Wall Hanging Bracket Set)
OT-WH30SL is a dedicated bracket set for hanging this TM-m30II-SL printer on a wall.
Contents of the OT-WH30SL package
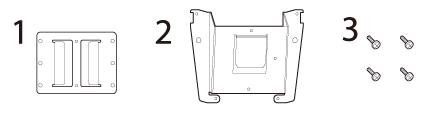
1. Wall-mount
2. Bracket
3. Four 3 x 8 screws for attaching the bracket to the printer
Using OT-WH30SL
This section describes how to install and use OT-WH30SL.
Make sure to read the cautions and notes to prevent the printer from falling from the wall.
 Note:
Note:-
The package does not include screws for attaching the wall-mount to a wall. Use screws appropriate to the type of the wall.
-
Depending on the conditions during storage and shipping, some rust may form around the edges of the wall-mount or bracket. If you find such rust, remove it with sandpaper.
-
Turn off the printer.
-
Disconnect the AC cable from the power outlet.
-
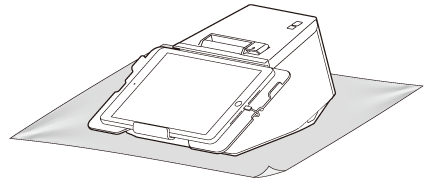
Put the printer on a soft cloth or cushioning material.
-
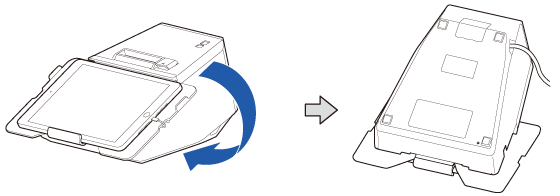
Turn over the printer.
-
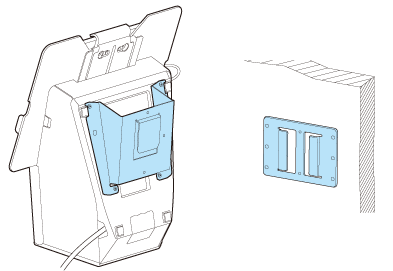
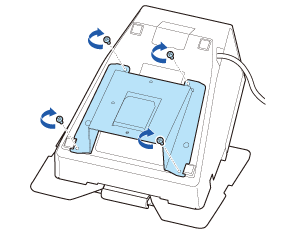
Attach the bracket to the printer using the included four screws.
-
Attach the wall-mount to a wall.
-
To fix the printer securely, install the wall-mount on a wall made of wood, concrete, or metal. The thickness of the wall should be 10 mm or more.
-
To ensure adequate strength for supporting the printer with the wall-mount, use screws that are appropriate to the type of the wall and have enough thread length. A screw with 4 mm diameter and length of 12 mm or more is recommended.
-
Make sure to secure the wall-mount to the wall using the all six screw holes in the wall-mount.
-
Ensure sufficient space around the printer before attaching the wall-mount.
-
Check that there is enough space for opening the roll paper cover.
-
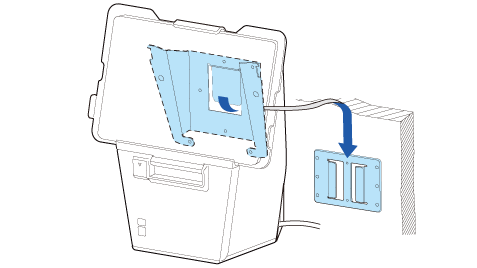
Slide the bracket into the slots of the wall-mount.
 CAUTION:
Tighten the screws completely. Otherwise, the screws will get loose and may cause the bracket or the printer to fall resulting in injury or accident.
CAUTION: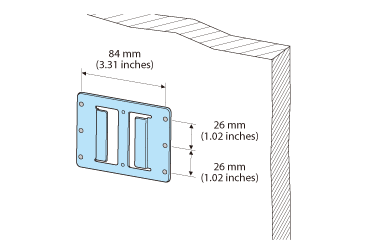 CAUTION:
Before mounting the printer, make sure that the wall-mount is securely attached to the wall.
Before Using the Printer
Part Names
Setup of the Tablet
Setup of the Printer
Basic Operations
Cleaning
Troubleshooting
Using the Optional Products
Appendix
Top > Using the Optional Products > OT-WH30SL (Wall Hanging Bracket Set)
OT-WH30SL (Wall Hanging Bracket Set)
OT-WH30SL is a dedicated bracket set for hanging this TM-m30II-SL printer on a wall.
Contents of the OT-WH30SL package
1. Wall-mount
2. Bracket
3. Four 3 x 8 screws for attaching the bracket to the printer
Using OT-WH30SL
This section describes how to install and use OT-WH30SL.
Make sure to read the cautions and notes to prevent the printer from falling from the wall.
Note:-
The package does not include screws for attaching the wall-mount to a wall. Use screws appropriate to the type of the wall.
-
Depending on the conditions during storage and shipping, some rust may form around the edges of the wall-mount or bracket. If you find such rust, remove it with sandpaper.
-
Turn off the printer.
-
Disconnect the AC cable from the power outlet.
-
Put the printer on a soft cloth or cushioning material.
-
Turn over the printer.
-
Attach the bracket to the printer using the included four screws.
-
Attach the wall-mount to a wall.
-
To fix the printer securely, install the wall-mount on a wall made of wood, concrete, or metal. The thickness of the wall should be 10 mm or more.
-
To ensure adequate strength for supporting the printer with the wall-mount, use screws that are appropriate to the type of the wall and have enough thread length. A screw with 4 mm diameter and length of 12 mm or more is recommended.
-
Make sure to secure the wall-mount to the wall using the all six screw holes in the wall-mount.
-
Ensure sufficient space around the printer before attaching the wall-mount.
-
Check that there is enough space for opening the roll paper cover.
-
Slide the bracket into the slots of the wall-mount.
CAUTION:Tighten the screws completely. Otherwise, the screws will get loose and may cause the bracket or the printer to fall resulting in injury or accident.
CAUTION:CAUTION:Before mounting the printer, make sure that the wall-mount is securely attached to the wall.