
Before Using the Printer
Part Names
Setup of the Tablet
Setup of the Printer
Basic Operations
Cleaning
Troubleshooting
Using the Optional Products
Appendix
Top > Setup of the Printer > Placing the Printer
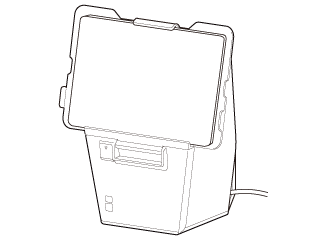
Placing the Printer
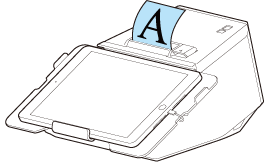
The printer can be placed either horizontally or vertically.
 CAUTION:
-
Do not place the printer in locations subject to high dust levels.
-
Do not give a high impact on the printer during operation. Doing so may cause the print failure.
-
Be careful not to place cords or foreign substances under the printer.
-
When using a cash drawer, secure the printer to prevent it from moving due to vibrations.
Placing the Printer Horizontally
Install the printer on a level and flat surface.
The roll paper is ejected from the top side, and the roll paper cover opens upward.
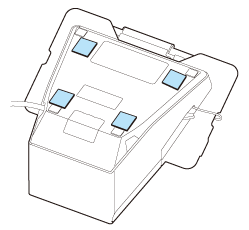
How to Secure the Printer
If you want to secure the printer to the installation site such as a table, use the optional tape (model number: DF-10).
Follow the procedure below to secure the printer with the tape.
-
Turn off the printer.
-
Disconnect the AC cable from the power outlet.
-
Turn over the printer.
-
Remove the backing sheet from the tape.
-
Attach four pieces of the tape to the bottom of the printer, and then remove another backing sheet from each tape.
-
Place the printer on the installation surface, and then hold the printer down to secure it.
 Note:
Note:-
The tape is hook and loop fastener. To remove the printer from the installation surface disengaging the hook and loop fastener tape, apply a force to peel the printer from the surface. However, if you repeat removing and reattaching the tape multiple times, the tape may become less cohesive. In such case, replace the tape (DF-10) with new ones.
-
Since four pieces of the tape need to be attached to the printer, you need two sets of DF-10 at a time.
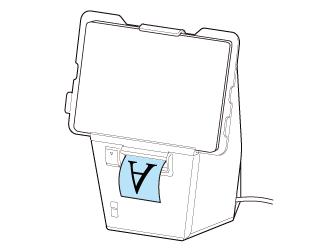
Placing the Printer Vertically
There are the following two methods to place the printer vertically.
-
Using the optional DF-10 tape, stand the printer on a table.
-
Using the optional OT-WH30SL hanging bracket set, hang the printer on a wall.

The roll paper is ejected from the front side, and the roll paper cover opens frontward.
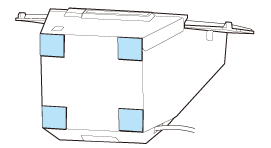
How to Stand the Printer
Follow the procedure below to stand the printer vertically on a table.
Place the printer on a level and flat surface.
CAUTION:Make sure to secure the printer using the DF-10 tape. If you just place the printer on a table, the printer may fall over when it or mounted tablet is pressed hard.
-
Turn off the printer.
-
Disconnect the AC cable from the power outlet.
-
Remove the backing sheet from the tape.
-
Attach four pieces of the tape to the bottom of the printer, and then remove another backing sheet from each tape.
-
Place the printer on the installation surface, and then hold the printer down to secure it.
 Note:
Note:-
The tape is hook and loop fastener. To remove the printer from the installation surface disengaging the hook and loop fastener tape, apply a force to peel the printer from the surface. However, if you repeat removing and reattaching the tape multiple times, the tape may become less cohesive. In such case, replace the tape (DF-10) with new ones.
-
Since four pieces of the tape need to be attached to the printer, you need two sets of DF-10 at a time.
Before Using the Printer
Part Names
Setup of the Tablet
Setup of the Printer
Basic Operations
Cleaning
Troubleshooting
Using the Optional Products
Appendix
Top > Setup of the Printer > Placing the Printer
Placing the Printer
The printer can be placed either horizontally or vertically.
CAUTION:-
Do not place the printer in locations subject to high dust levels.
-
Do not give a high impact on the printer during operation. Doing so may cause the print failure.
-
Be careful not to place cords or foreign substances under the printer.
-
When using a cash drawer, secure the printer to prevent it from moving due to vibrations.
Placing the Printer Horizontally
Install the printer on a level and flat surface.
The roll paper is ejected from the top side, and the roll paper cover opens upward.
How to Secure the Printer
If you want to secure the printer to the installation site such as a table, use the optional tape (model number: DF-10).
Follow the procedure below to secure the printer with the tape.
-
Turn off the printer.
-
Disconnect the AC cable from the power outlet.
-
Turn over the printer.
-
Remove the backing sheet from the tape.
-
Attach four pieces of the tape to the bottom of the printer, and then remove another backing sheet from each tape.
-
Place the printer on the installation surface, and then hold the printer down to secure it.
Note:-
The tape is hook and loop fastener. To remove the printer from the installation surface disengaging the hook and loop fastener tape, apply a force to peel the printer from the surface. However, if you repeat removing and reattaching the tape multiple times, the tape may become less cohesive. In such case, replace the tape (DF-10) with new ones.
-
Since four pieces of the tape need to be attached to the printer, you need two sets of DF-10 at a time.
Placing the Printer Vertically
There are the following two methods to place the printer vertically.
-
Using the optional DF-10 tape, stand the printer on a table.
-
Using the optional OT-WH30SL hanging bracket set, hang the printer on a wall.
The roll paper is ejected from the front side, and the roll paper cover opens frontward.
How to Stand the Printer
Follow the procedure below to stand the printer vertically on a table.
Place the printer on a level and flat surface.
CAUTION:Make sure to secure the printer using the DF-10 tape. If you just place the printer on a table, the printer may fall over when it or mounted tablet is pressed hard.
-
Turn off the printer.
-
Disconnect the AC cable from the power outlet.
-
Remove the backing sheet from the tape.
-
Attach four pieces of the tape to the bottom of the printer, and then remove another backing sheet from each tape.
-
Place the printer on the installation surface, and then hold the printer down to secure it.
Note:-
The tape is hook and loop fastener. To remove the printer from the installation surface disengaging the hook and loop fastener tape, apply a force to peel the printer from the surface. However, if you repeat removing and reattaching the tape multiple times, the tape may become less cohesive. In such case, replace the tape (DF-10) with new ones.
-
Since four pieces of the tape need to be attached to the printer, you need two sets of DF-10 at a time.