
Before Using the Printer
Part Names
Basic Operations
Setup
Cleaning
Troubleshooting
Product Specifications
Appendix
Top > Basic Operations > Charging the Battery
Charging the Battery
Charging the Battery using the Included USB Cable
 CAUTION:
-
When charging the battery, install the battery to the printer.
-
Charge the battery in an environment of approximately 0 to 40 °C {32 to 104 °F}.
 Note:
Note:-
When the printer is used for the first time, the battery needs to be charged for approximately 3 hours.
-
Use a USB power adapter or USB port that complies with the USB Type-C Standard.
-
Only USB Type-C standard power mode is supported. The charging time varies depending on the power supply capability and settings of the USB power adapter and port.

-
Connect the included USB cable to the printer.
-
Connect the USB cable to a commercially available USB power adapter or computer.
-
The charge LED lights up when charging starts.
-
The charge LED turns off when charging is complete.
-
Disconnect the USB cable from the printer.
If the remaining battery charge is almost full, charging will not start.
Check the battery LED for remaining battery charge.

Charge LED
This LED indicates the battery charge status.
 |
The battery is charging |
 (Flashing) |
Battery charge error |
 |
Battery is fully charged or not being charged |


Charging the Battery with the Optional Battery Charger
By using the optional battery charger, the battery removed from the printer can be charged alone.
-
OT-SB20II
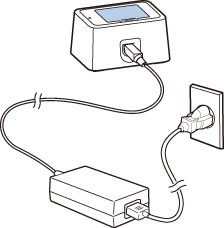
-
OT-CH20II
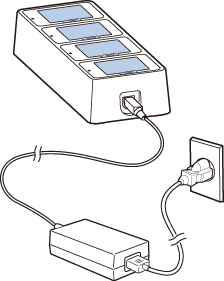
For more information, see the User's Manual of the battery charger from the link below.
https://support.epson.net/publist/bsredirect.php?code=M001510
Before Using the Printer
Part Names
Basic Operations
Setup
Cleaning
Troubleshooting
Product Specifications
Appendix
Top > Basic Operations > Charging the Battery
Charging the Battery
Charging the Battery using the Included USB Cable
CAUTION:-
When charging the battery, install the battery to the printer.
-
Charge the battery in an environment of approximately 0 to 40 °C {32 to 104 °F}.
Note:-
When the printer is used for the first time, the battery needs to be charged for approximately 3 hours.
-
Use a USB power adapter or USB port that complies with the USB Type-C Standard.
-
Only USB Type-C standard power mode is supported. The charging time varies depending on the power supply capability and settings of the USB power adapter and port.
-
Connect the included USB cable to the printer.
-
Connect the USB cable to a commercially available USB power adapter or computer.
-
The charge LED lights up when charging starts.
-
The charge LED turns off when charging is complete.
-
Disconnect the USB cable from the printer.
If the remaining battery charge is almost full, charging will not start.
Check the battery LED for remaining battery charge.
Charge LED
This LED indicates the battery charge status.
|
|
The battery is charging |
|
(Flashing) |
Battery charge error |
|
|
Battery is fully charged or not being charged |
Charging the Battery with the Optional Battery Charger
By using the optional battery charger, the battery removed from the printer can be charged alone.
-
OT-SB20II
-
OT-CH20II
For more information, see the User's Manual of the battery charger from the link below.
https://support.epson.net/publist/bsredirect.php?code=M001510