Stitching Photos
You can combine scanned photos to create a single image.
-
This feature is only available for models with A4 scanner glass.
-
The sum of long edges should be less than 25,000 pixels.
-
This feature may not be available depending on the originals, such as monotones or charts.
-
Load the originals in your scanner.
Note:See the User's Guide supplied with the scanner for details on loading originals.
-
Press the start button on the scanner to start scanning and open Epson ScanSmart.
-
If you cannot start scanning from the
 button on the scanner, see the Troubleshooting link in Related Information at the end of the chapter.
-
You can also start scanning from your computer.Open Epson ScanSmart, and then click one of the SCAN options.
-
-
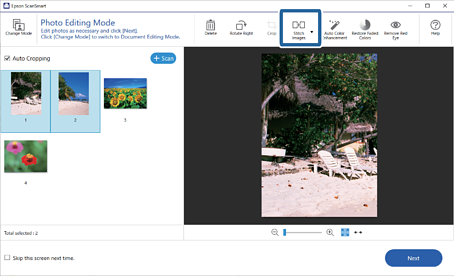
Select photos you want to combine, and then click Stitch Images.
-
Select Basic Stitching or Advanced Stitching.
-
On the Stitch Images screen, check the stitched image. When you have select Basic Stitching, you can edit the image using the buttons at the top of the screen to rotate and change the position of the images.
-
Click OK, and then follow the on-screen instructions.