Before Using the Product
Part Names
Setup
Basic Operations
Installing the Product in Various Ways
Cleaning
Troubleshooting
Appendix
Top > Setup > Connecting to the Printer
Connecting to the Printer
Connect the USB cable of the customer display to the USB connector on the printer.
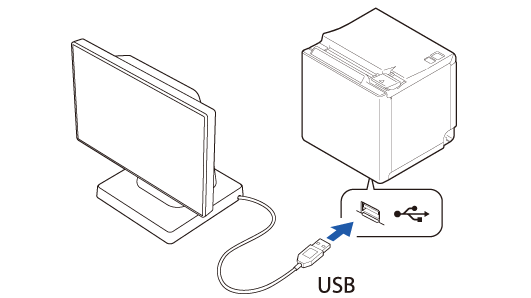
Please click the following URL to see the printers that can be connected to this customer display.
 https://support.epson.net/publist/bsredirect.php?code=M001607
 CAUTION:
-
Make sure to turn the printer off and then connect this product.
-
The product cannot be connected to the USB-A Device Charging (iPad 2.1A) connector that is mounted on TM-m30II-H or other printers.
-
If you want to extend the USB cable, use the optional USB extension cable (OT-UL30).
-
The optional kit, EXTENSION POLE UNIT FOR DM-D70 (DP-70), includes a USB extension cable.
-
You can mount this product to TM-m30II-S as a rear display. Refer to TM-m30II-S User‘s Manual for more details.
https://support.epson.net/publist/bsredirect.php?code=m001306
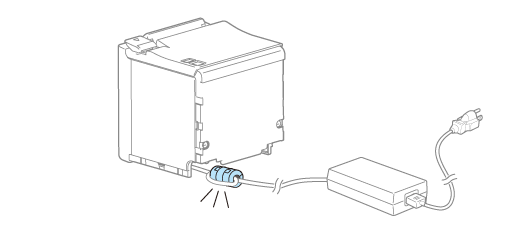
When Connecting to TM-m30II (For DM-D70 that came with ferrite core)
If your DM-D70 came with a ferrite core, and you want to connect the DM-D70 to TM-m30II, attach the ferrite core to the DC cable of the TM-m30II.
Bring the ferrite core as close as possible to TM-m30II.
-
Turn off the TM-m30II printer.
-
Put the DC cable of TM-m30II into the ferrite core.
-
Wrap the cable around the ferrite core once.
-
Close the ferrite core until it clicks.
-
Connect the AC cable to a power outlet.


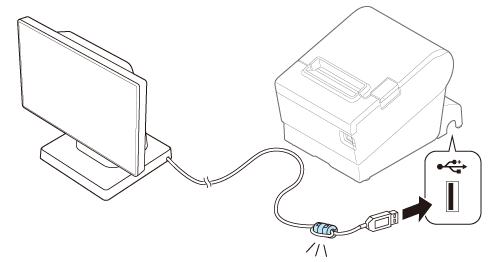
When Connecting to TM-T88VII (For DM-D70 that came with ferrite core)
If your DM-D70 came with a ferrite core, and you want to connect the DM-D70 to TM-T88VII, attach the ferrite core to the USB cable of the DM-D70.
Bring the ferrite core as close as possible to TM-T88VII.
-
Put the USB cable of the product into the ferrite core.
-
Wrap the cable around the ferrite core once.
-
Close the ferrite core until it clicks.
Before Using the Product
Part Names
Setup
Basic Operations
Installing the Product in Various Ways
Cleaning
Troubleshooting
Appendix
Top > Setup > Connecting to the Printer
Connecting to the Printer
Connect the USB cable of the customer display to the USB connector on the printer.
Please click the following URL to see the printers that can be connected to this customer display.
https://support.epson.net/publist/bsredirect.php?code=M001607
CAUTION:-
Make sure to turn the printer off and then connect this product.
-
The product cannot be connected to the USB-A Device Charging (iPad 2.1A) connector that is mounted on TM-m30II-H or other printers.
-
If you want to extend the USB cable, use the optional USB extension cable (OT-UL30).
-
The optional kit, EXTENSION POLE UNIT FOR DM-D70 (DP-70), includes a USB extension cable.
-
You can mount this product to TM-m30II-S as a rear display. Refer to TM-m30II-S User‘s Manual for more details.
https://support.epson.net/publist/bsredirect.php?code=m001306
When Connecting to TM-m30II (For DM-D70 that came with ferrite core)
If your DM-D70 came with a ferrite core, and you want to connect the DM-D70 to TM-m30II, attach the ferrite core to the DC cable of the TM-m30II.
Bring the ferrite core as close as possible to TM-m30II.
-
Turn off the TM-m30II printer.
-
Put the DC cable of TM-m30II into the ferrite core.
-
Wrap the cable around the ferrite core once.
-
Close the ferrite core until it clicks.
-
Connect the AC cable to a power outlet.
When Connecting to TM-T88VII (For DM-D70 that came with ferrite core)
If your DM-D70 came with a ferrite core, and you want to connect the DM-D70 to TM-T88VII, attach the ferrite core to the USB cable of the DM-D70.
Bring the ferrite core as close as possible to TM-T88VII.
-
Put the USB cable of the product into the ferrite core.
-
Wrap the cable around the ferrite core once.
-
Close the ferrite core until it clicks.