Before Using the Printer
Part Names and Functions
Setting Up
Basic Operations
Useful Functions
Creating a Label with a Special Form
Cleaning the Printer
Preference
Troubleshooting
Product Specifications
Symbol, Accent Mark, Frame
Top > Part Names and Functions > Operation Panel
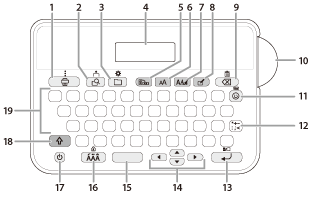
Operation Panel
 |
|
1 |
Starts printing the entered contents on tape.
+ : Lets you select "Continuous" or "Mirror" printing options. |
|
2 |
Displays the print image (preview). + : Lets you feed the tape. |
|
3 |
Lets you save, select, or delete label files. + : Lets you set the print density, battery type, display language, and inch/cm. |
|
4 |
Display |
|
5 |
Switches between vertical/horizontal writing. |
|
6 |
Changes the font size. |
|
7 |
Changes the font. |
|
8 |
Displays the edit menus. You can change label margins, character spacing, label length, layout, and font style.
|
|
9 |
Deletes a character. When pressed during operation, cancels your operation or selection. + : Deletes all characters. |
|
10 |
Cut Button |
|
11 |
Lets you enter symbols, pictures, marks, and two-digit numbers.
+ : Lets you enter a frame. |
|
12 |
Lets you enter punctuation marks. + : Enters other symbols. |
|
13 |
Confirms your selection, or begins a new line. + : Begins a new block (paragraph). |
|
14 |
Cursor keys + : Moves the cursor to the beginning of a block (paragraph), the end of a block (paragraph), the beginning of a line, or the end of a line. |
|
15 |
Enters a space. |
|
16 |
Accent + : Caps Lock |
|
17 |
Power button |
|
18 |
Shift |
|
19 |
Character buttons |

Before Using the Printer
Part Names and Functions
Setting Up
Basic Operations
Useful Functions
Creating a Label with a Special Form
Cleaning the Printer
Preference
Troubleshooting
Product Specifications
Symbol, Accent Mark, Frame
Top > Part Names and Functions > Operation Panel
Operation Panel
|
|
|
1 |
Starts printing the entered contents on tape.
+ : Lets you select "Continuous" or "Mirror" printing options. |
|
2 |
Displays the print image (preview). + : Lets you feed the tape. |
|
3 |
Lets you save, select, or delete label files. + : Lets you set the print density, battery type, display language, and inch/cm. |
|
4 |
Display |
|
5 |
Switches between vertical/horizontal writing. |
|
6 |
Changes the font size. |
|
7 |
Changes the font. |
|
8 |
Displays the edit menus. You can change label margins, character spacing, label length, layout, and font style.
|
|
9 |
Deletes a character. When pressed during operation, cancels your operation or selection. + : Deletes all characters. |
|
10 |
Cut Button |
|
11 |
Lets you enter symbols, pictures, marks, and two-digit numbers.
+ : Lets you enter a frame. |
|
12 |
Lets you enter punctuation marks. + : Enters other symbols. |
|
13 |
Confirms your selection, or begins a new line. + : Begins a new block (paragraph). |
|
14 |
Cursor keys + : Moves the cursor to the beginning of a block (paragraph), the end of a block (paragraph), the beginning of a line, or the end of a line. |
|
15 |
Enters a space. |
|
16 |
Accent + : Caps Lock |
|
17 |
Power button |
|
18 |
Shift |
|
19 |
Character buttons |