Before Using the Printer
Part Names and Functions
Setting Up
Basic Operations
Useful Functions
Creating a Label with a Special Form
Cleaning the Printer
Preference
Troubleshooting
Product Specifications
Symbol, Accent Mark, Frame
Top > Setting Up > Feeding the tape
Feeding the tape
 Caution CautionDo not touch the area near the tape exit during printing or when the cutter is in operation, as this may cause injury. |
 Note NoteDo not press the Cut Button before the tape stops. |
After setting a tape cartridge, make sure to feed tape.
-
Press + .
-
Using the arrow buttons, select "Tape feed", and press .
-
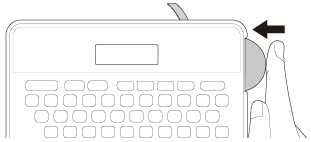
Cut the tape by pressing the Cut Button.
If you select "Set length", you can specify the length and feed the tape.
Before Using the Printer
Part Names and Functions
Setting Up
Basic Operations
Useful Functions
Creating a Label with a Special Form
Cleaning the Printer
Preference
Troubleshooting
Product Specifications
Symbol, Accent Mark, Frame
Top > Setting Up > Feeding the tape
Feeding the tape
|
Caution Do not touch the area near the tape exit during printing or when the cutter is in operation, as this may cause injury. |
|
Note Do not press the Cut Button before the tape stops. |
After setting a tape cartridge, make sure to feed tape.
-
Press + .
-
Using the arrow buttons, select "Tape feed", and press .
-
Cut the tape by pressing the Cut Button.
If you select "Set length", you can specify the length and feed the tape.