Before Using the Printer
Part Names and Functions
Setting Up
Basic Operations
Useful Functions
Creating a Label with a Special Form
Cleaning the Printer
Preference
Troubleshooting
Product Specifications
Symbol, Accent Mark, Frame
Top > Basic Operations > Attaching labels
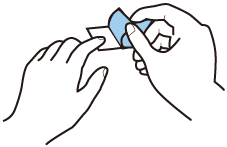
Attaching labels
Your printed labels are easy to attach to most surfaces.
 Caution Caution
|
-
Peel off the backing.
-
Place the label on the desired surface and press it down firmly.

Before Using the Printer
Part Names and Functions
Setting Up
Basic Operations
Useful Functions
Creating a Label with a Special Form
Cleaning the Printer
Preference
Troubleshooting
Product Specifications
Symbol, Accent Mark, Frame
Top > Basic Operations > Attaching labels
Attaching labels
Your printed labels are easy to attach to most surfaces.
Caution
|
-
Peel off the backing.
-
Place the label on the desired surface and press it down firmly.